Magnet Blocks®
While studying this tutorial, enable the Display filled magnets option in the Magnet parameter settings of PowerRanger. This will help you observe and understand the patterns. For production analysis, keep disabled to keep the chart clean.
Concept
Magnet Blocks® are the core tool of PowerRanger, by MethodAlgo's T.A.T.A's advance filtering algorithm. This algorithm considers factors such as candle patterns, time, speed, and candle ratios and volumes. It analyzes real-time price data to detect and filter the interaction of candle patterns and trading volume. When specific conditions are met, an extended horizontal area is displayed on a candle, called a magnet block.
Dynamic Support/Resistance
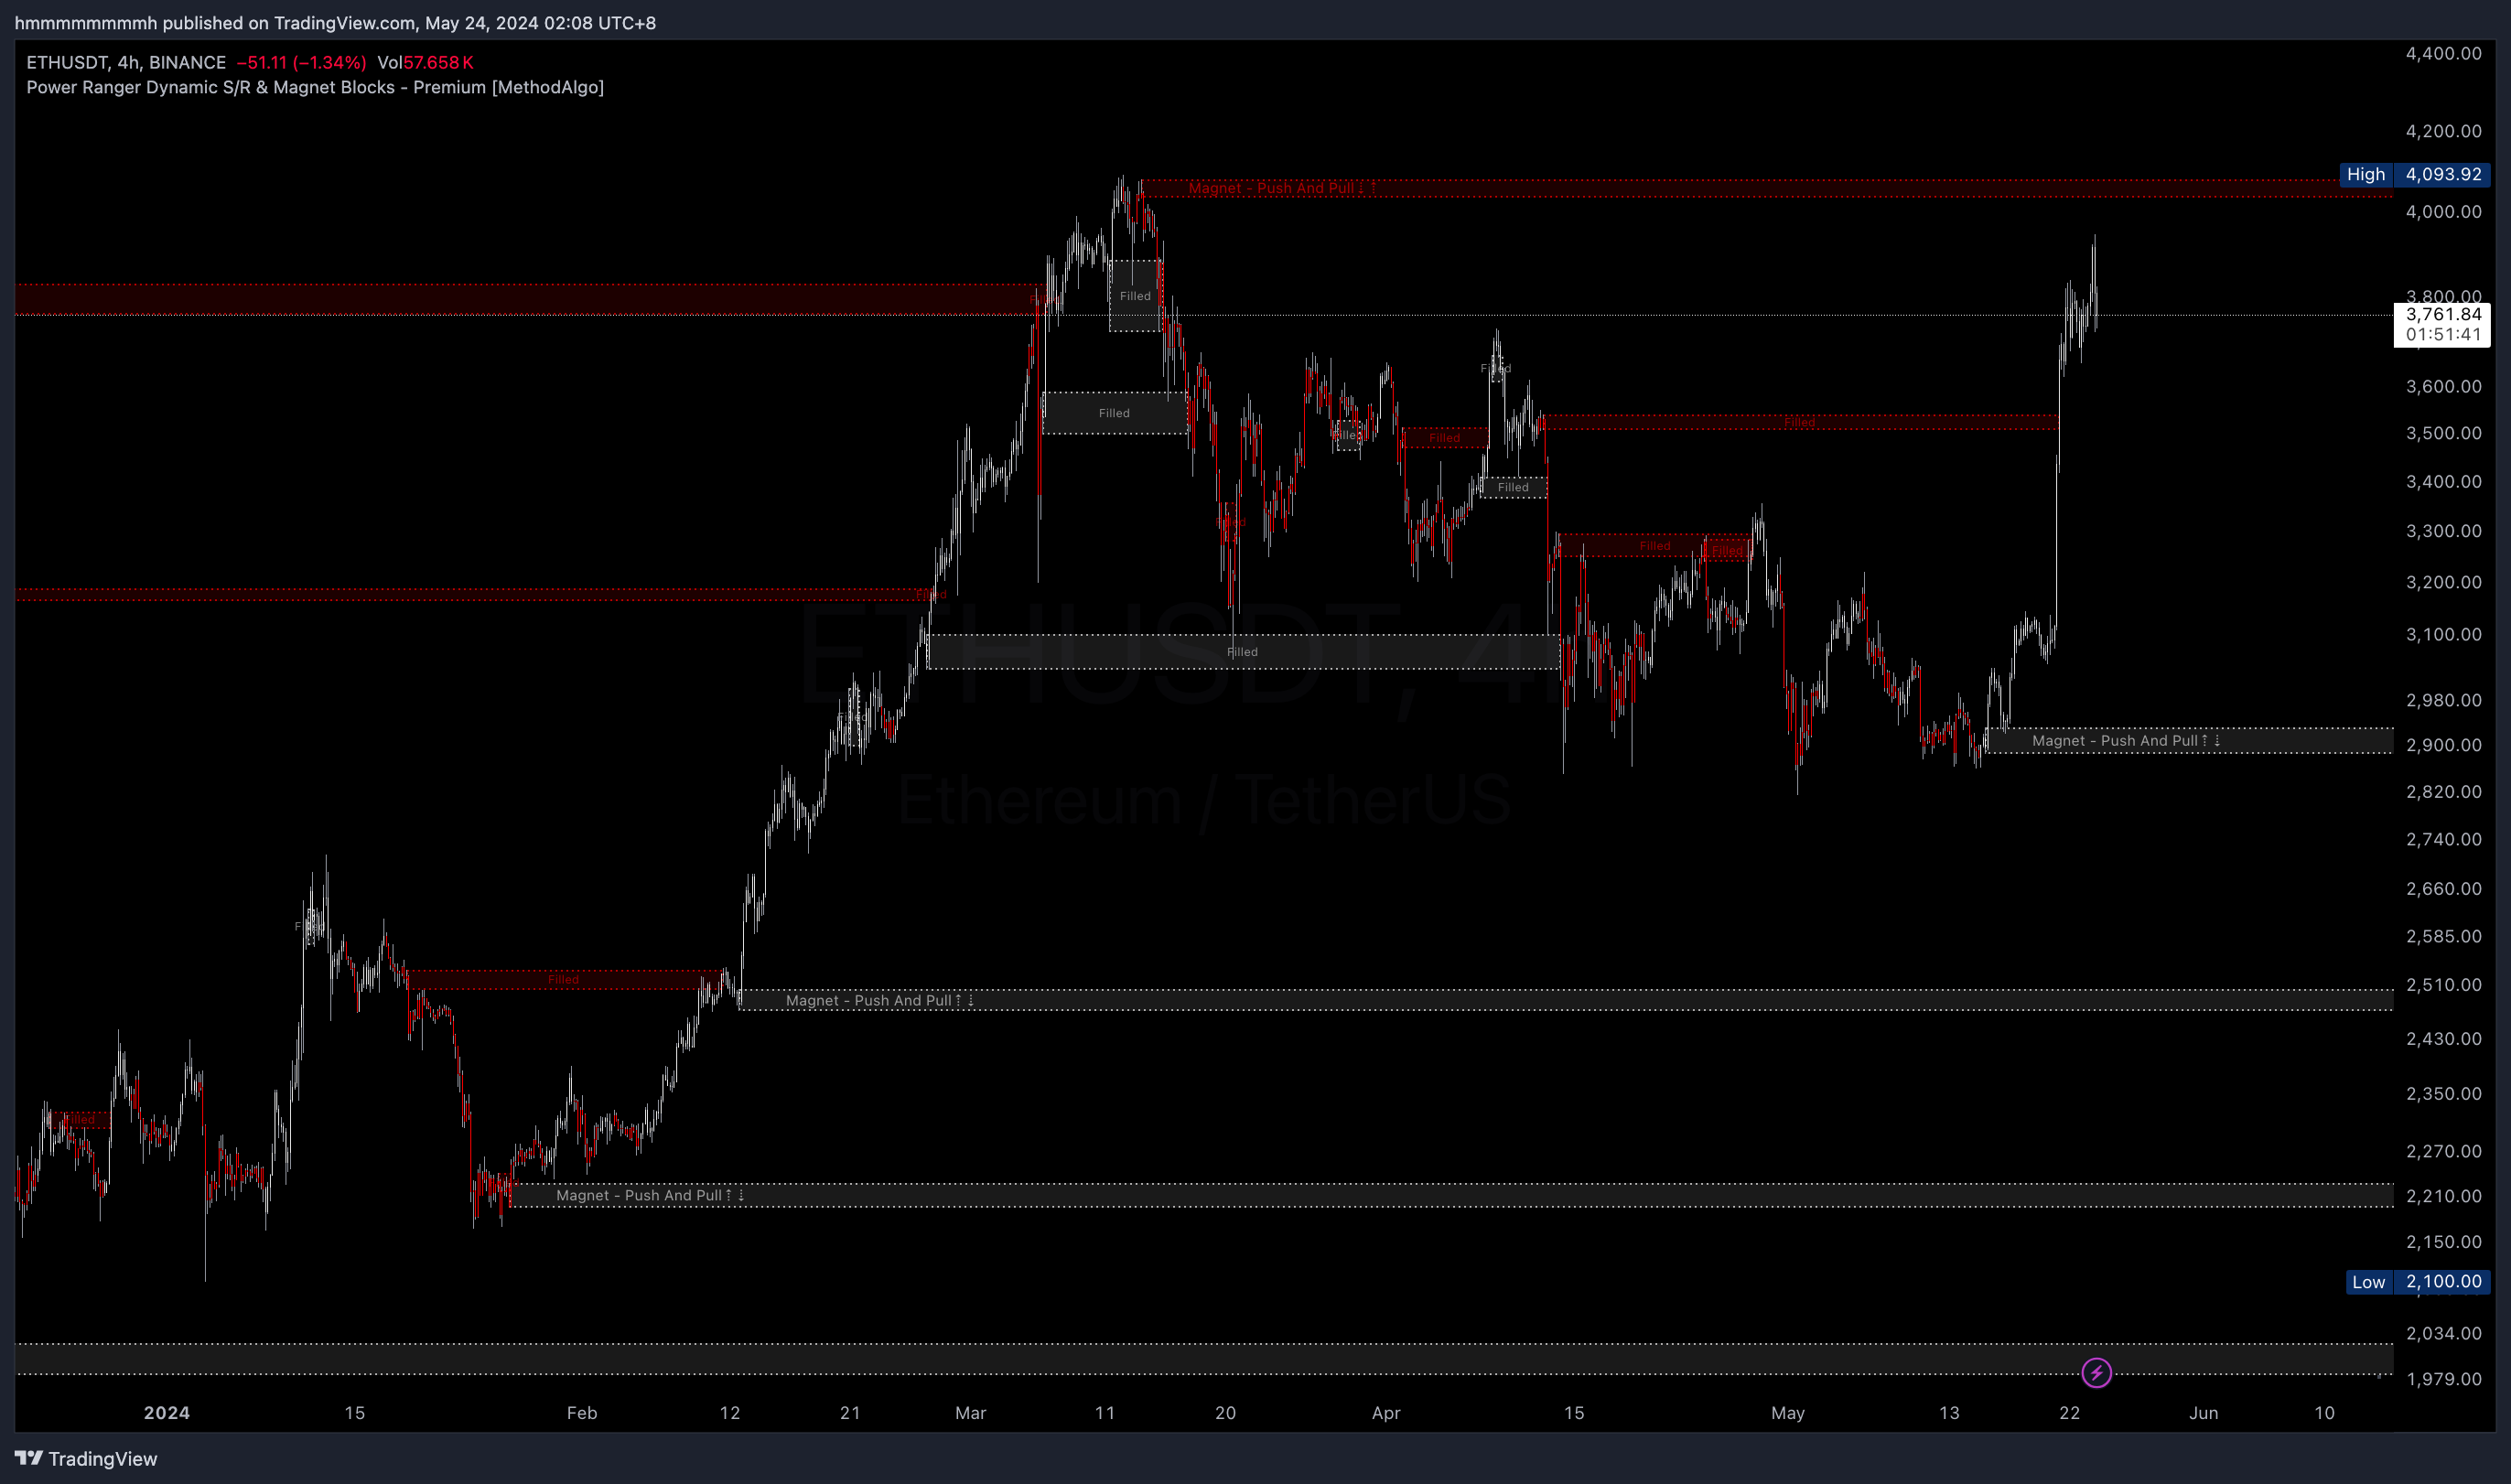
Magnet Blocks® are part of the dynamic support/resistance system in the MethodAlgo trading system. Although magnet blocks appear fixed on the chart, it's principle is similar to Grim Reaper's liquidity gaps. It initially acts as support/resistance,then attracting and accumulating liquidity over time. finally, pulling the price back to it.
Push and Pull
Once a magnet block is generated, its relationship with the price goes through two stages: Push and Pull.
Push: The impulse move that creates the magnet generates a liquidity gap, an area of buy-sell imbalance. This gap acts as initial support/resistance, causing the area behind the magnet to lose market attraction temporarily, eject the price to the opposite direction.Pull: Over time, accumulating liquidity draws the price back to this area.
Confluence
- Setting TP targets
- Using strong magnets as temporary SL references
- Assisting in trend bias
- Adding confluence to analysis
Interface
Magnet blocks are horizontal blocks, divided into Bull Magnet(white) and Bear Magnet(red).
- Bull magnets are labeled as:
Magnet - push and pull ↑↓ - Bear magnets are labeled as:
Magnet - push and pull ↓↑ - Filled magnets are labeled as
Filled(filled magnets are not displayed by default and need to be enabled in the settings)
Functionality
| Interface | Upper Edge | Below Lower Edge | Lower Edge | Above Upper Edge |
|---|---|---|---|---|
| Bull Magnet | Short TP | Long SL | N/A | N/A |
| Bear Magnet | N/A | N/A | Long TP | Short SL |
Strategies
Pull Strategy
This strategy can be used at any time, targeting the nearest magnet edge:
- TP: Set TP to the lower edge of the nearest bear magnet when long, or the upper edge of the nearest bull magnet when short.
Push Strategy
This strategy is used after a magnet is generated, executed after confirming with strong/weak magnets or with other tools:
- Entry: Enter after the candle moves away from the magnet.
- SL: Set SL below the lower edge of a bull magnet or above the upper edge of a bear magnet.
- Early TP: Exit early if a bear magnet appears when long, or a bull magnet appears when short.
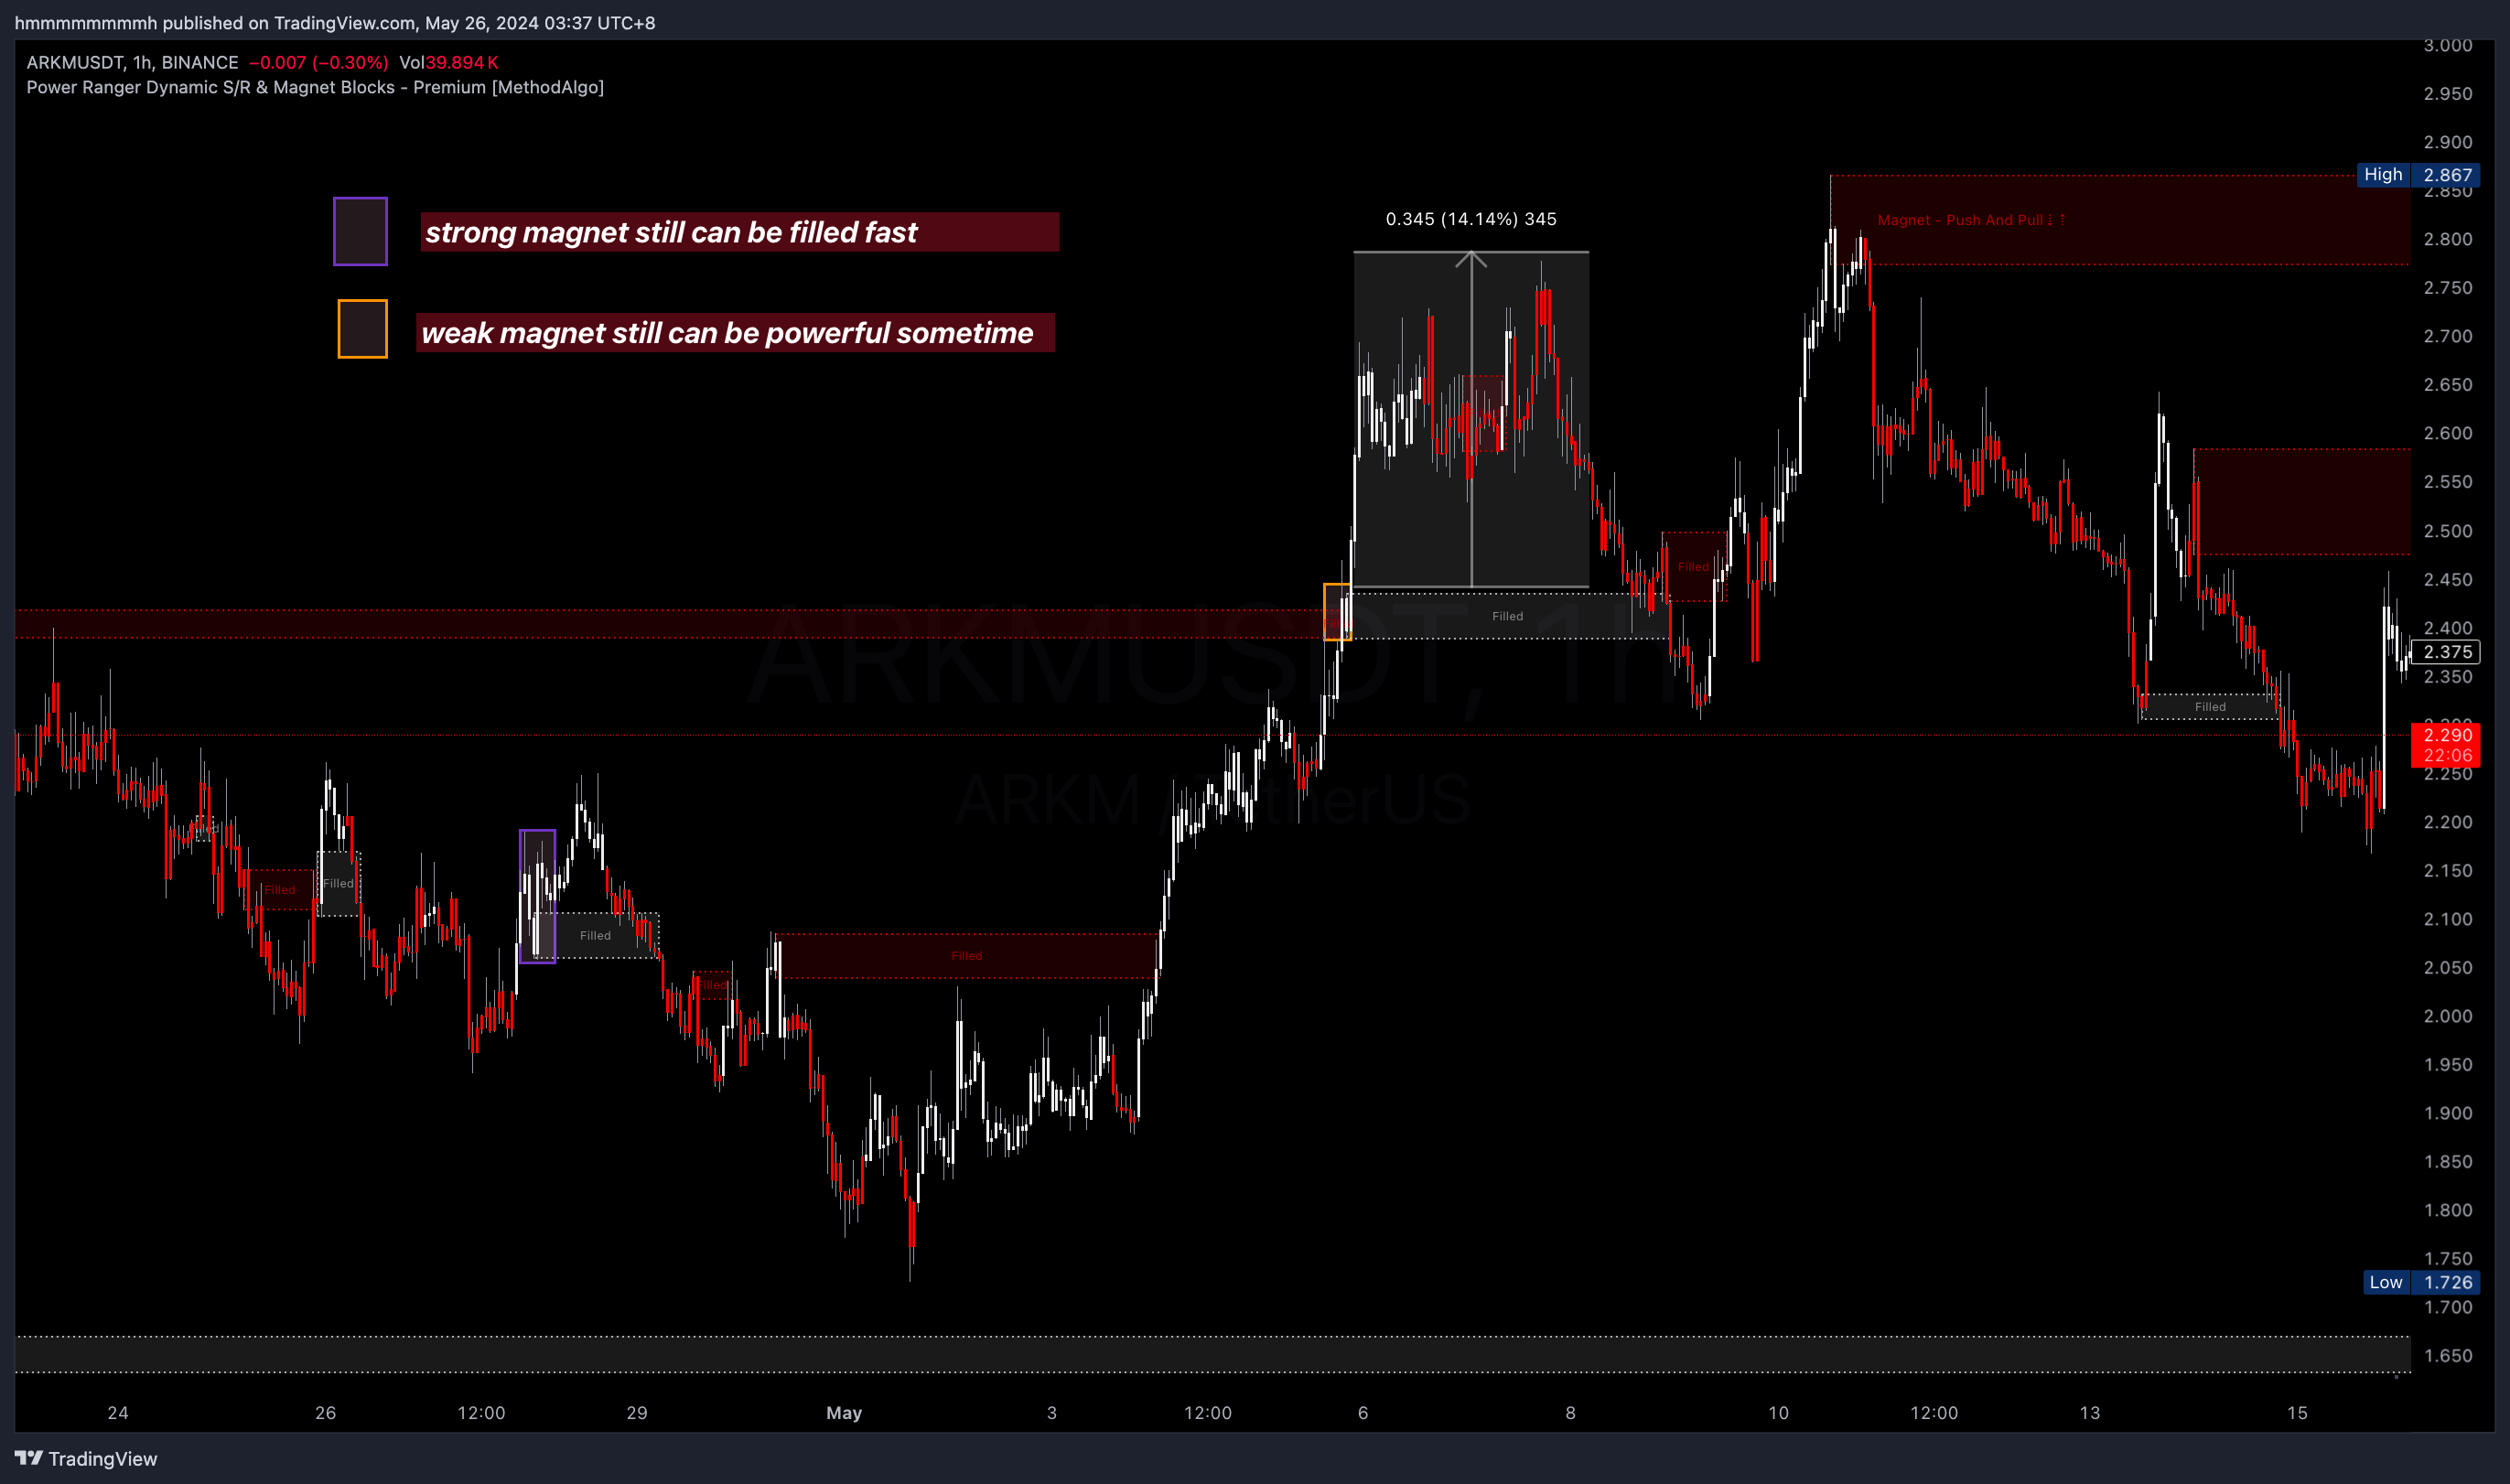
Distinguishing Strong/Weak Magnets
The concept of strong/weak magnets is based on the initial support/resistance effectiveness of the magnet. Distinguishing strong/weak magnets is crucial for the Push Strategy, but has no effect on the Pull Strategy. When a magnet block appears, we know the price will eventually return to this location to clear liquidity, but the time variable is unknown; it could be minutes, hours, months, or years. In daily trading, we only use magnets close to the price:
- Strong magnets: Push the price further, take longer to fill.
- Weak magnets: Usually filled within a few candles.
- The size of a magnet does not correlate with its strength.
Distinguishing Methods
The magnet algorithm considers composite factors, so there is currently no perfect method to 100% determine the strength of a magnet. However, we can use simple price action and composite indicator signals to distinguish a magnet's strength (initial support/resistance strength):
-
Active: Observation: Distinguish magnets based on candle movements before they are generated.
Magnet Strong Bull Magnet Strong Bear Magnet Weak Bull Magnet Weak Bear Magnet Candles before generation (5-10 candles) Downward or sideways Upward or sideways Upward Downward 
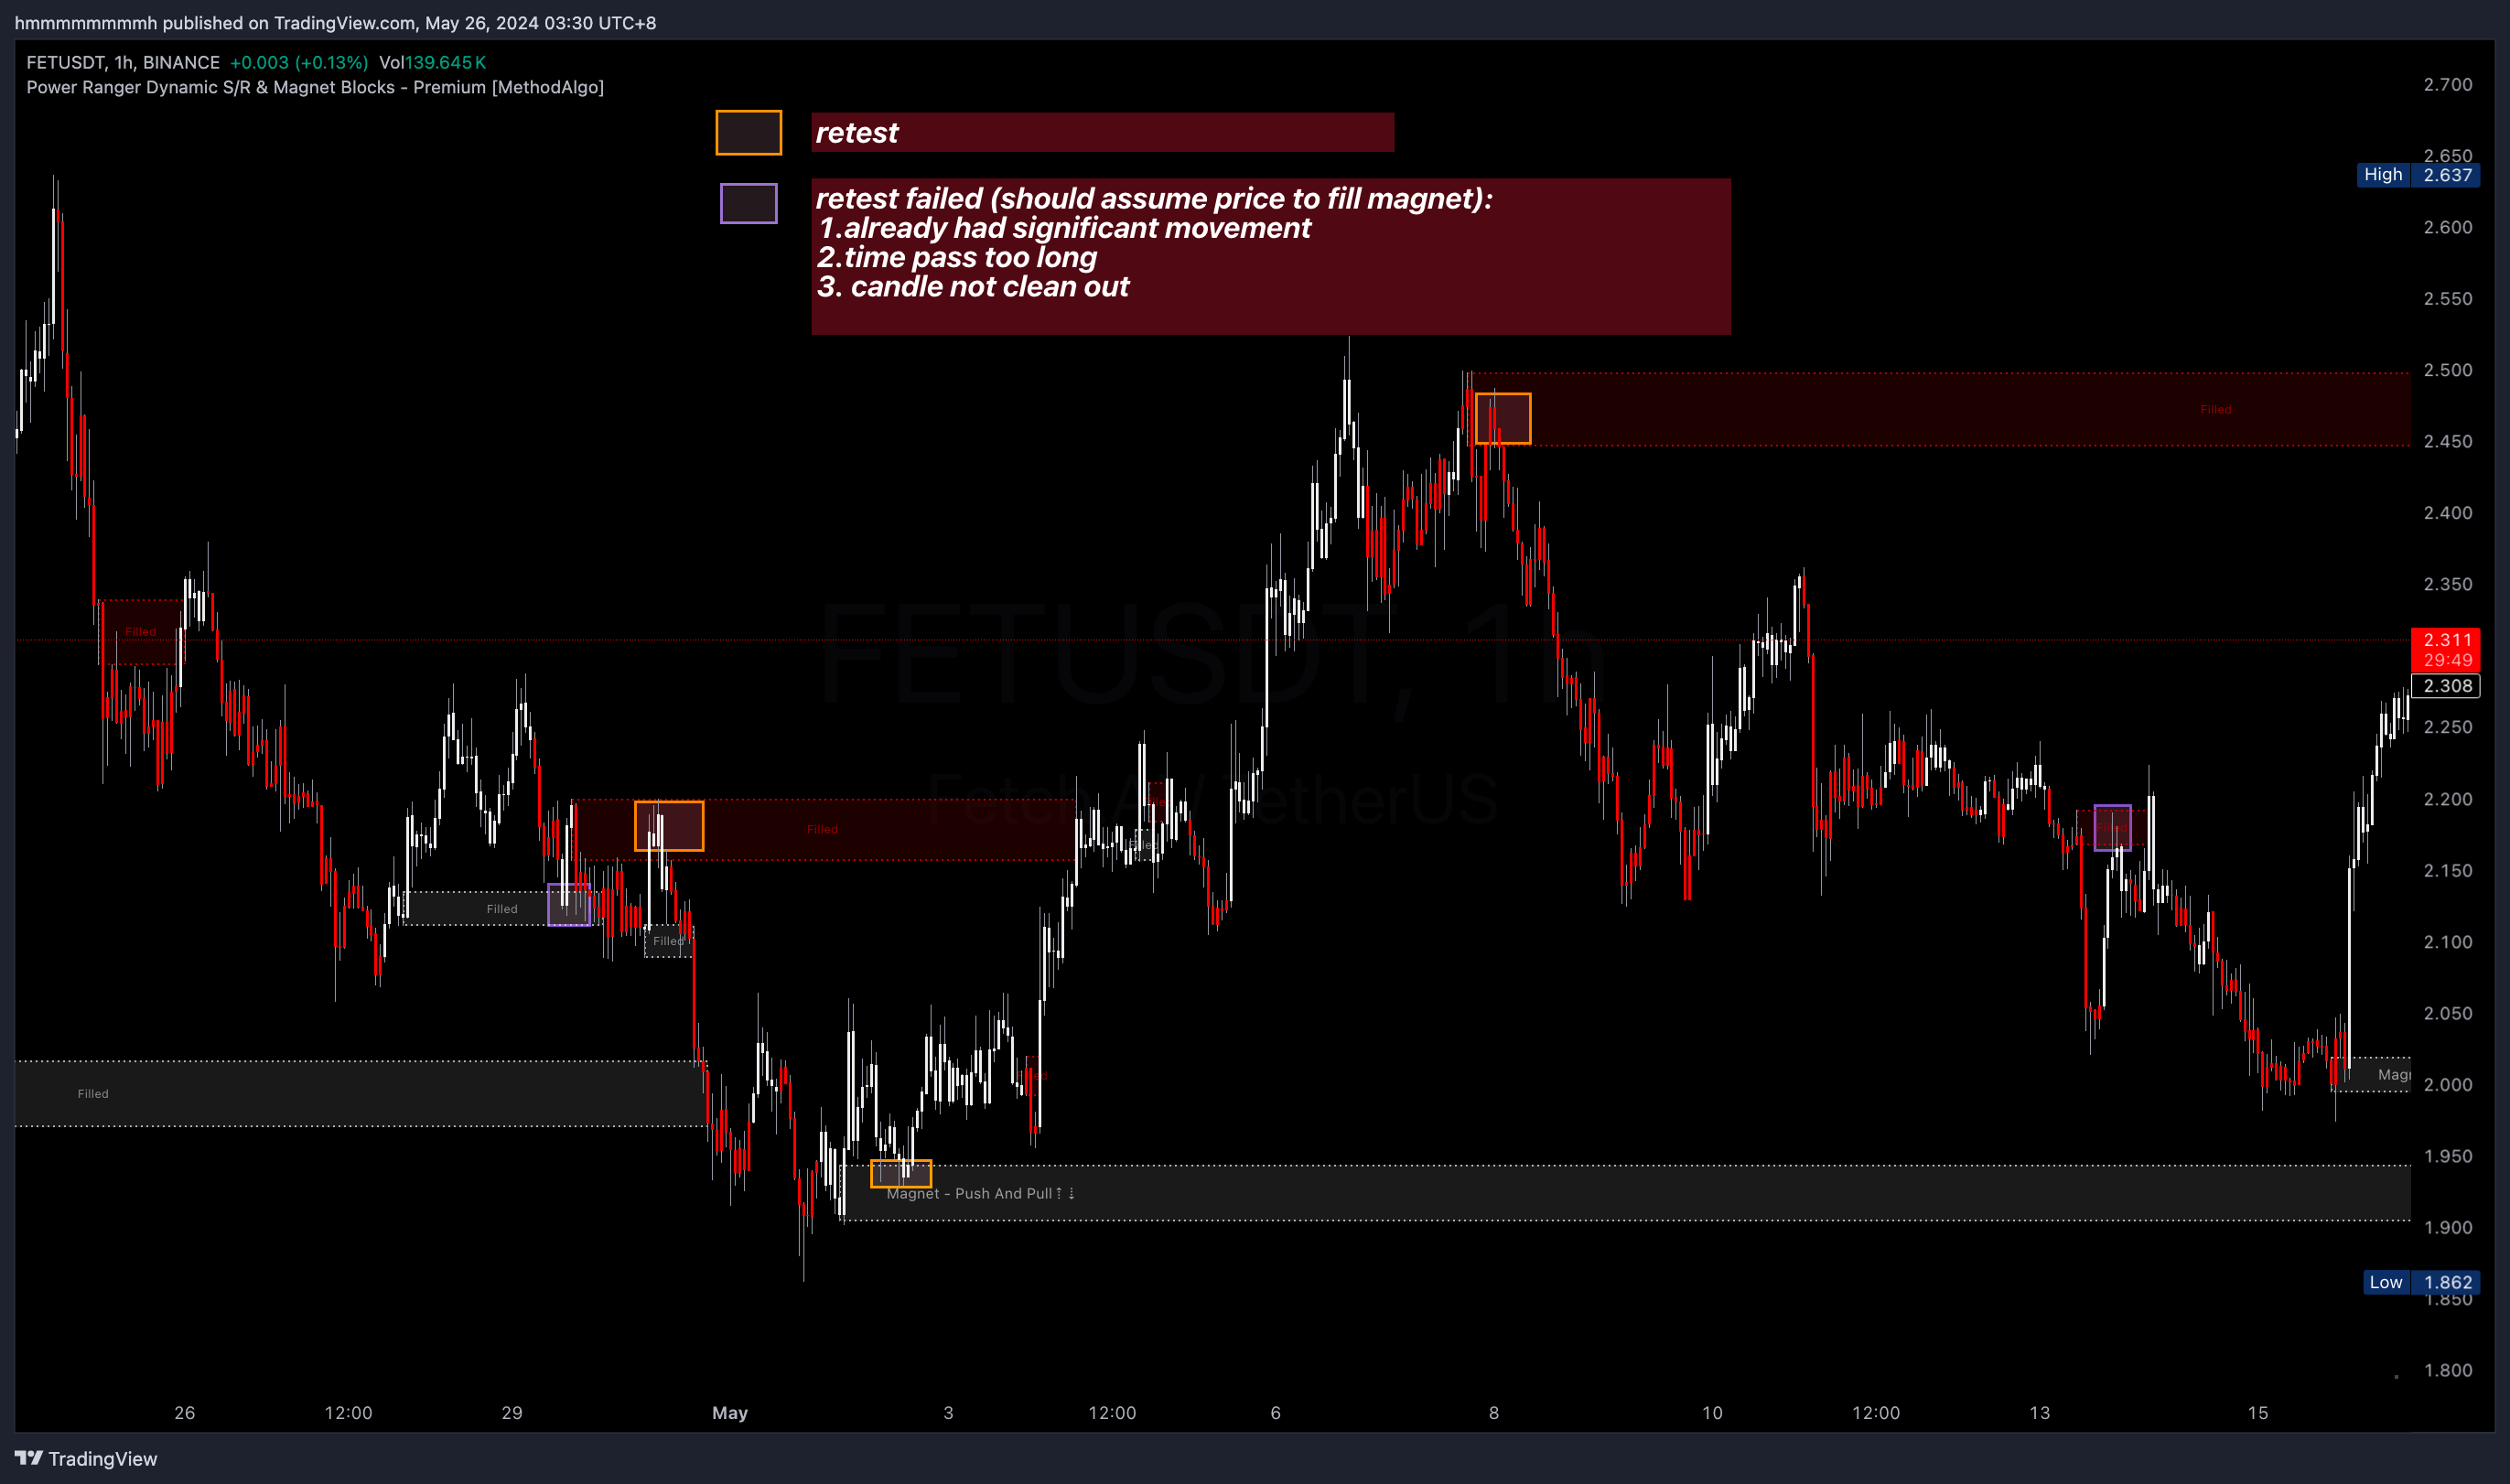
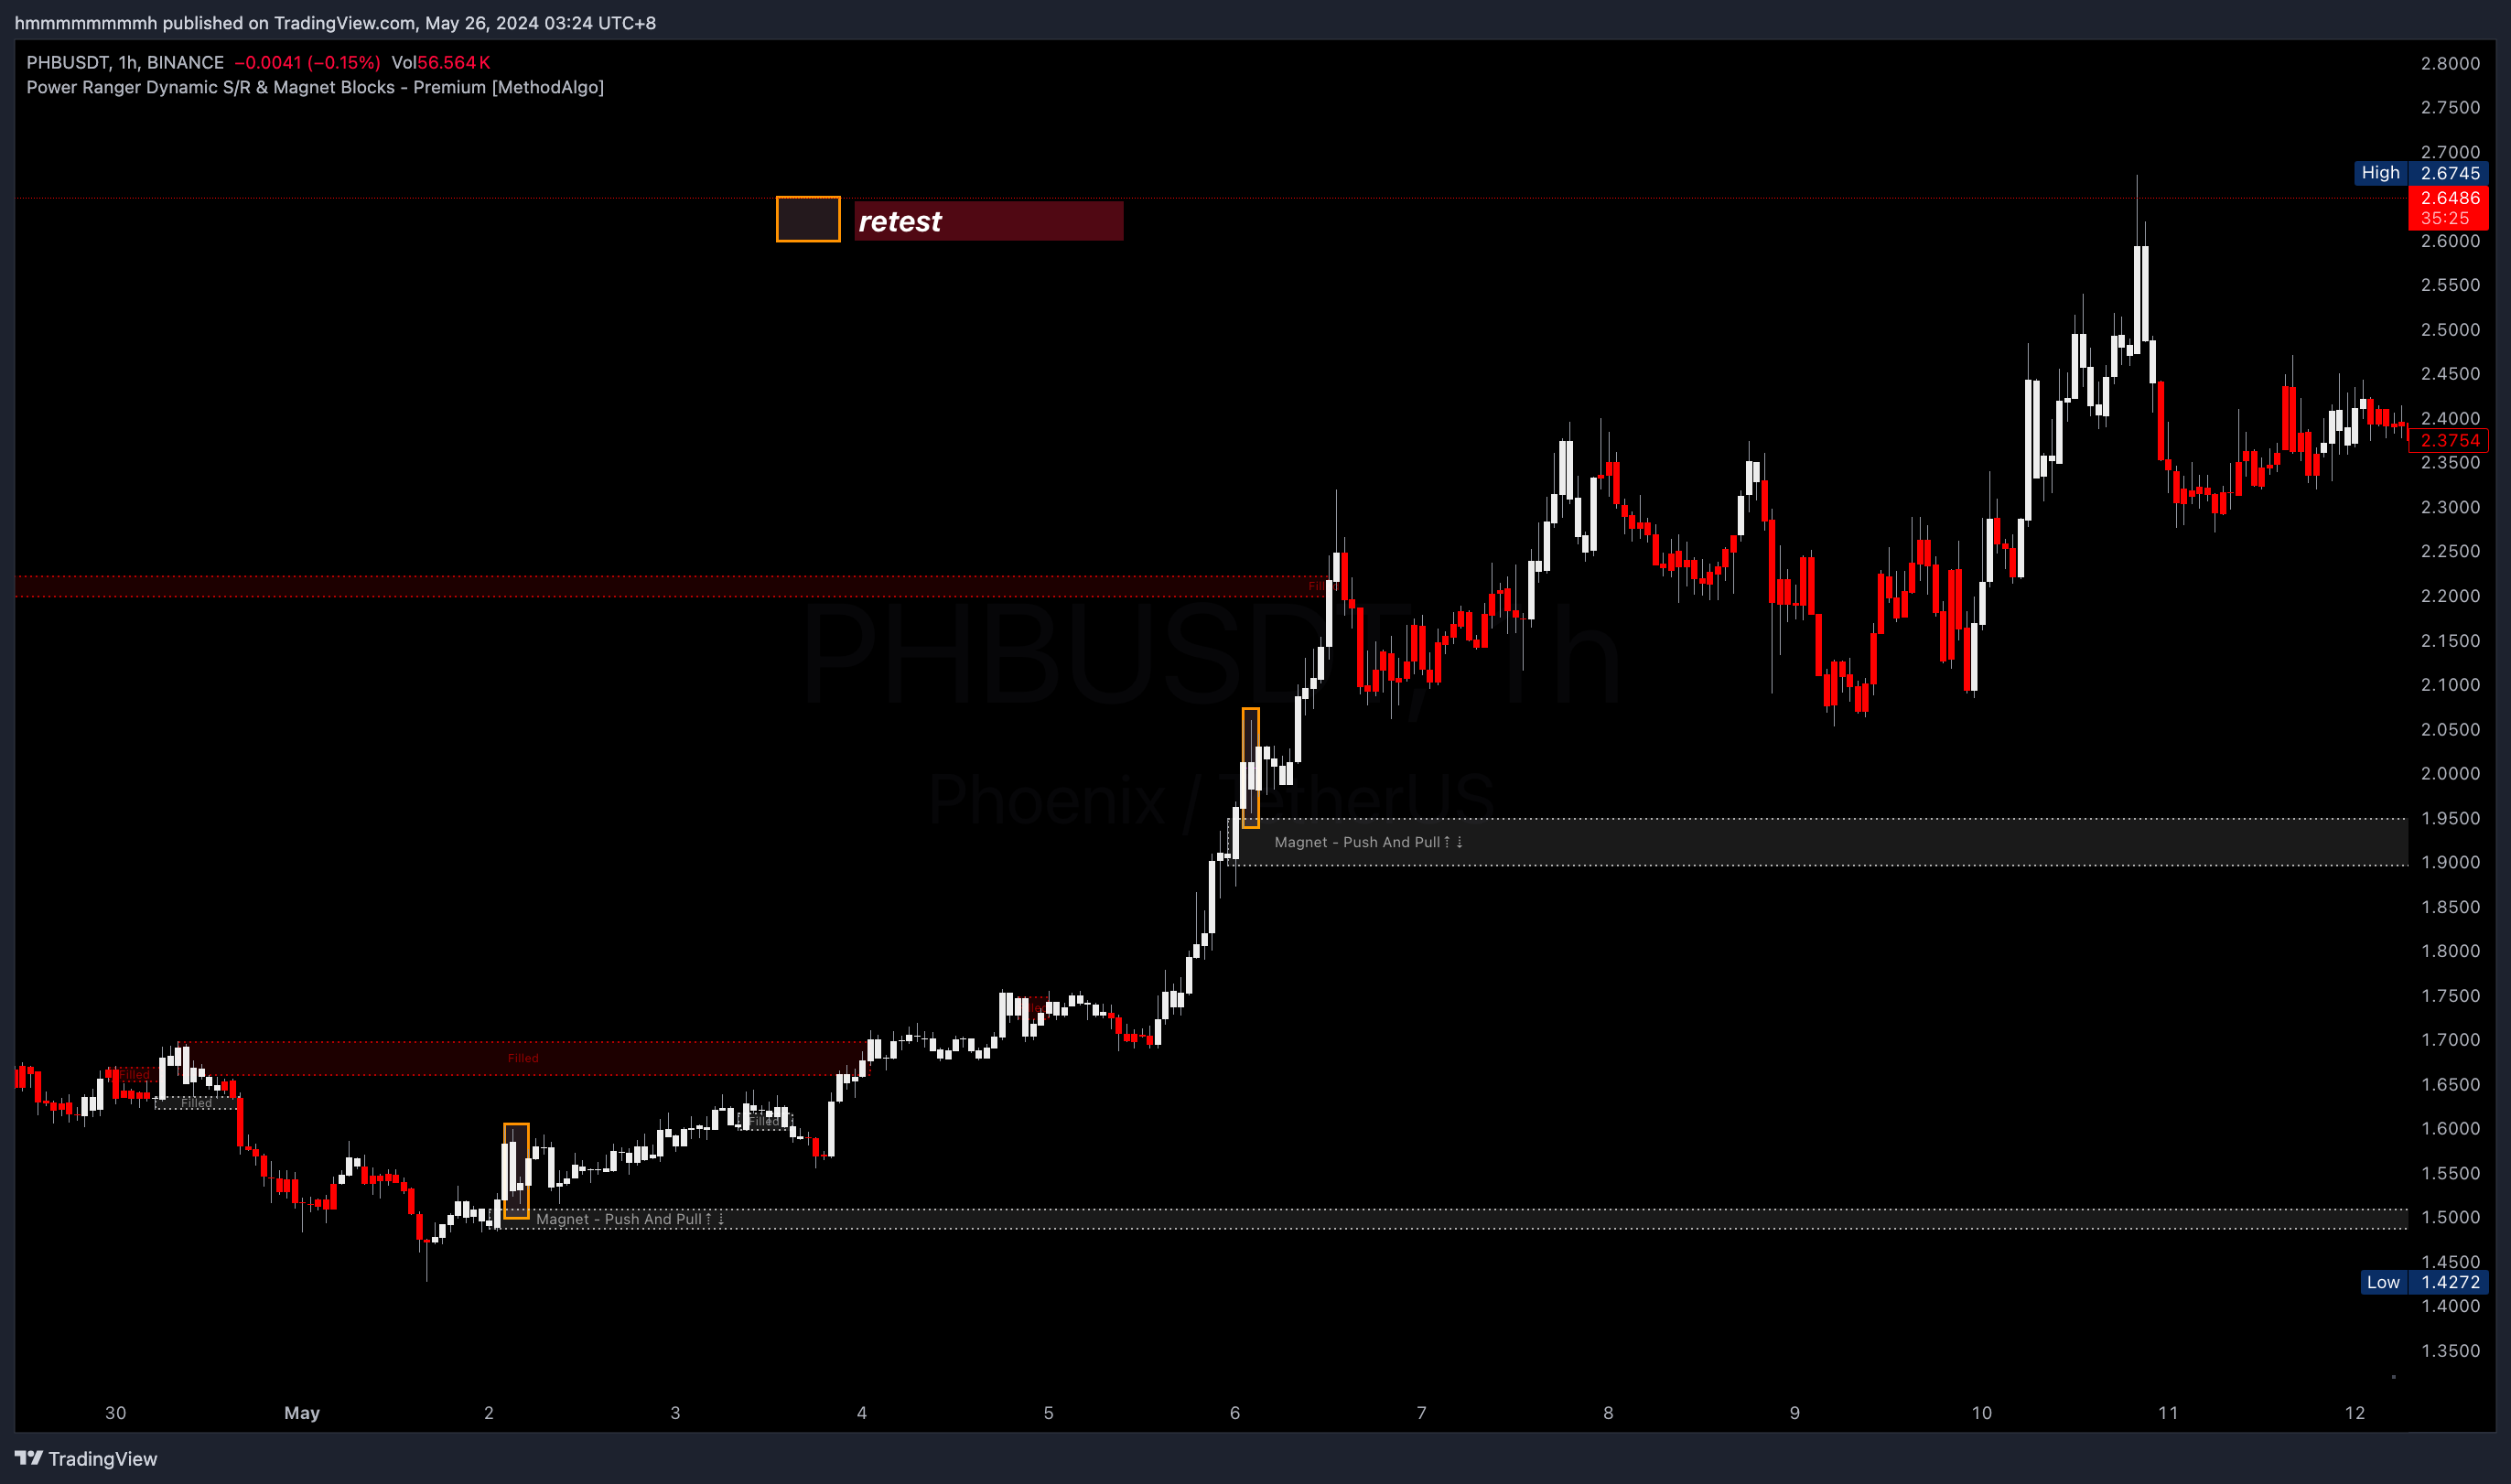
-
Passive: Retest : Observe the price's rejection from the magnet. If the price rejects the magnet strongly, even if it was initially considebear a weak magnet, it can be used as a strong magnet.
-
Use Grim Reaper's Smart Levels to verify magnet strength through the concept of liquidity.
-
Use Liquidity Detective's reversal triangles to determine magnet strength based on market strength.
The effectiveness of the above methods to distinguish strong/weak magnets is 3>=4>1>=2. Methods 1 and 2 are not perfect, as shown below:
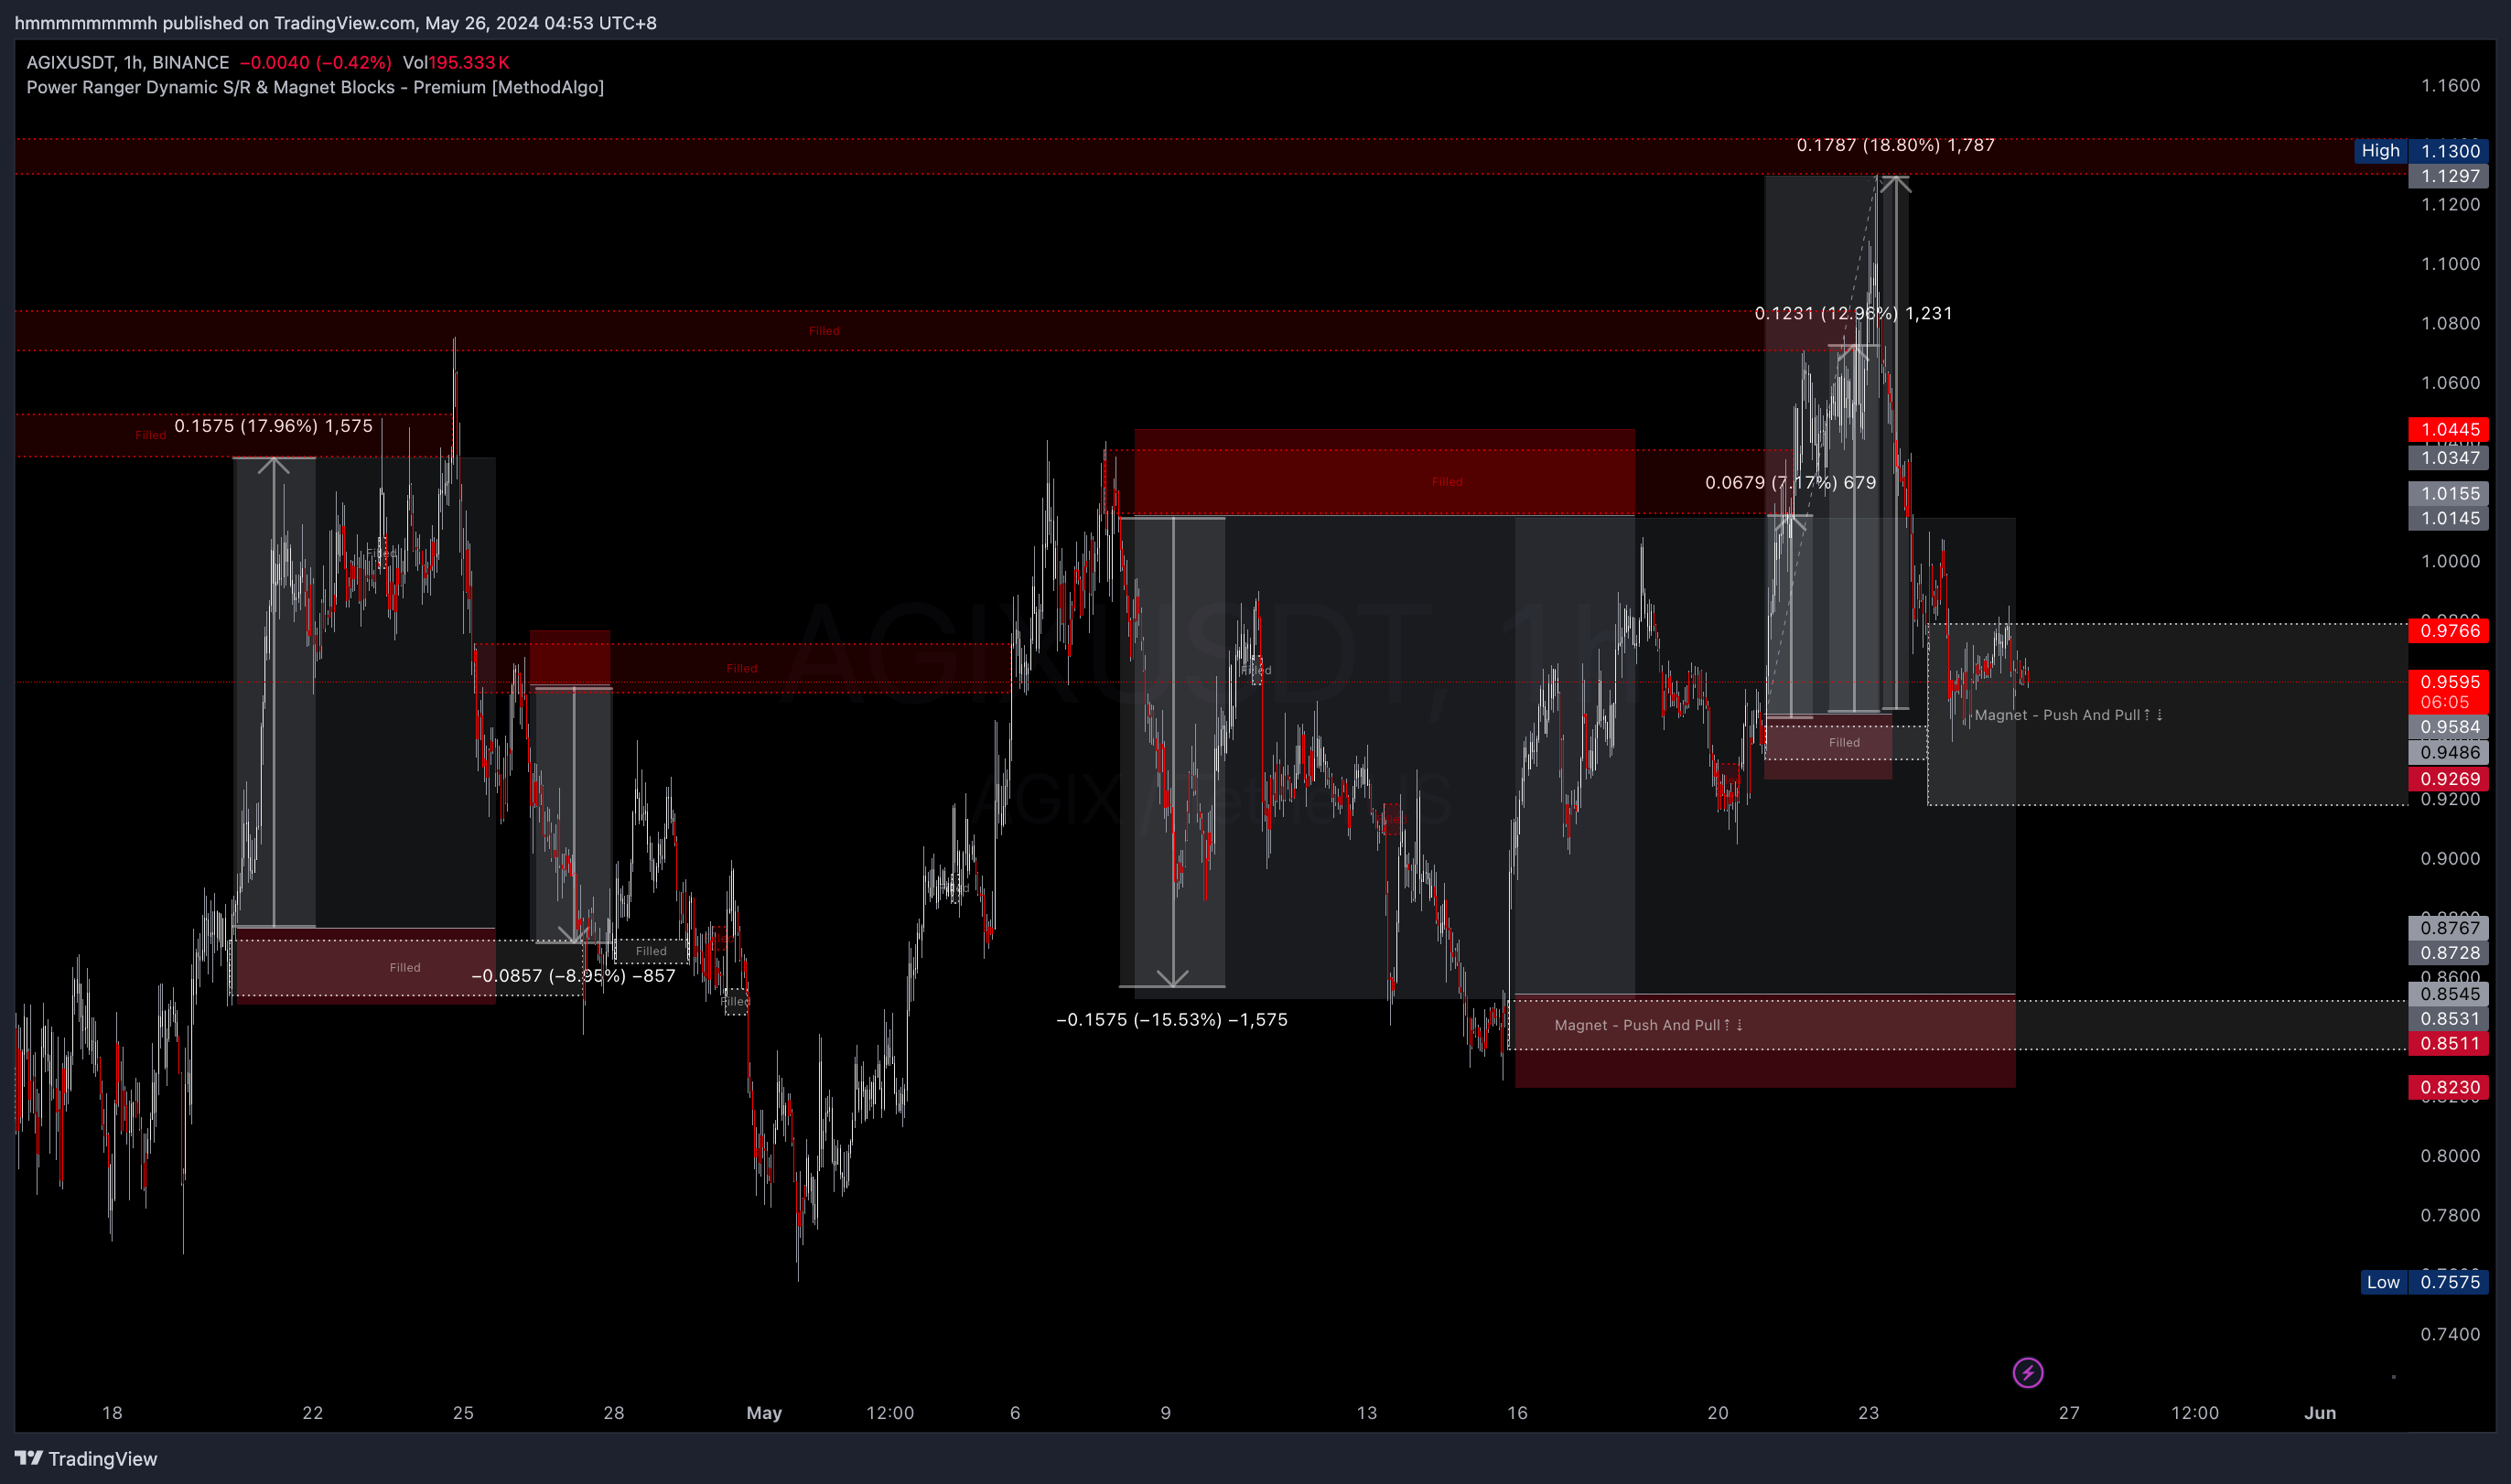
Examples
The AGIXUSDT chart above is an ideal example with continuous large swings and many strong magnets. Next, let's increase the difficulty and use other MethodAlgo tools to combine with magnets for confluence analysis to get successful trades.
Trendline and Magnets
When the price is above the trendline, bull magnets are likely to be strong bull magnets. As long as the price does not fall below the trendline (maintaining an uptrend), we shall expect the price to continue rising to fill the bear magnets.
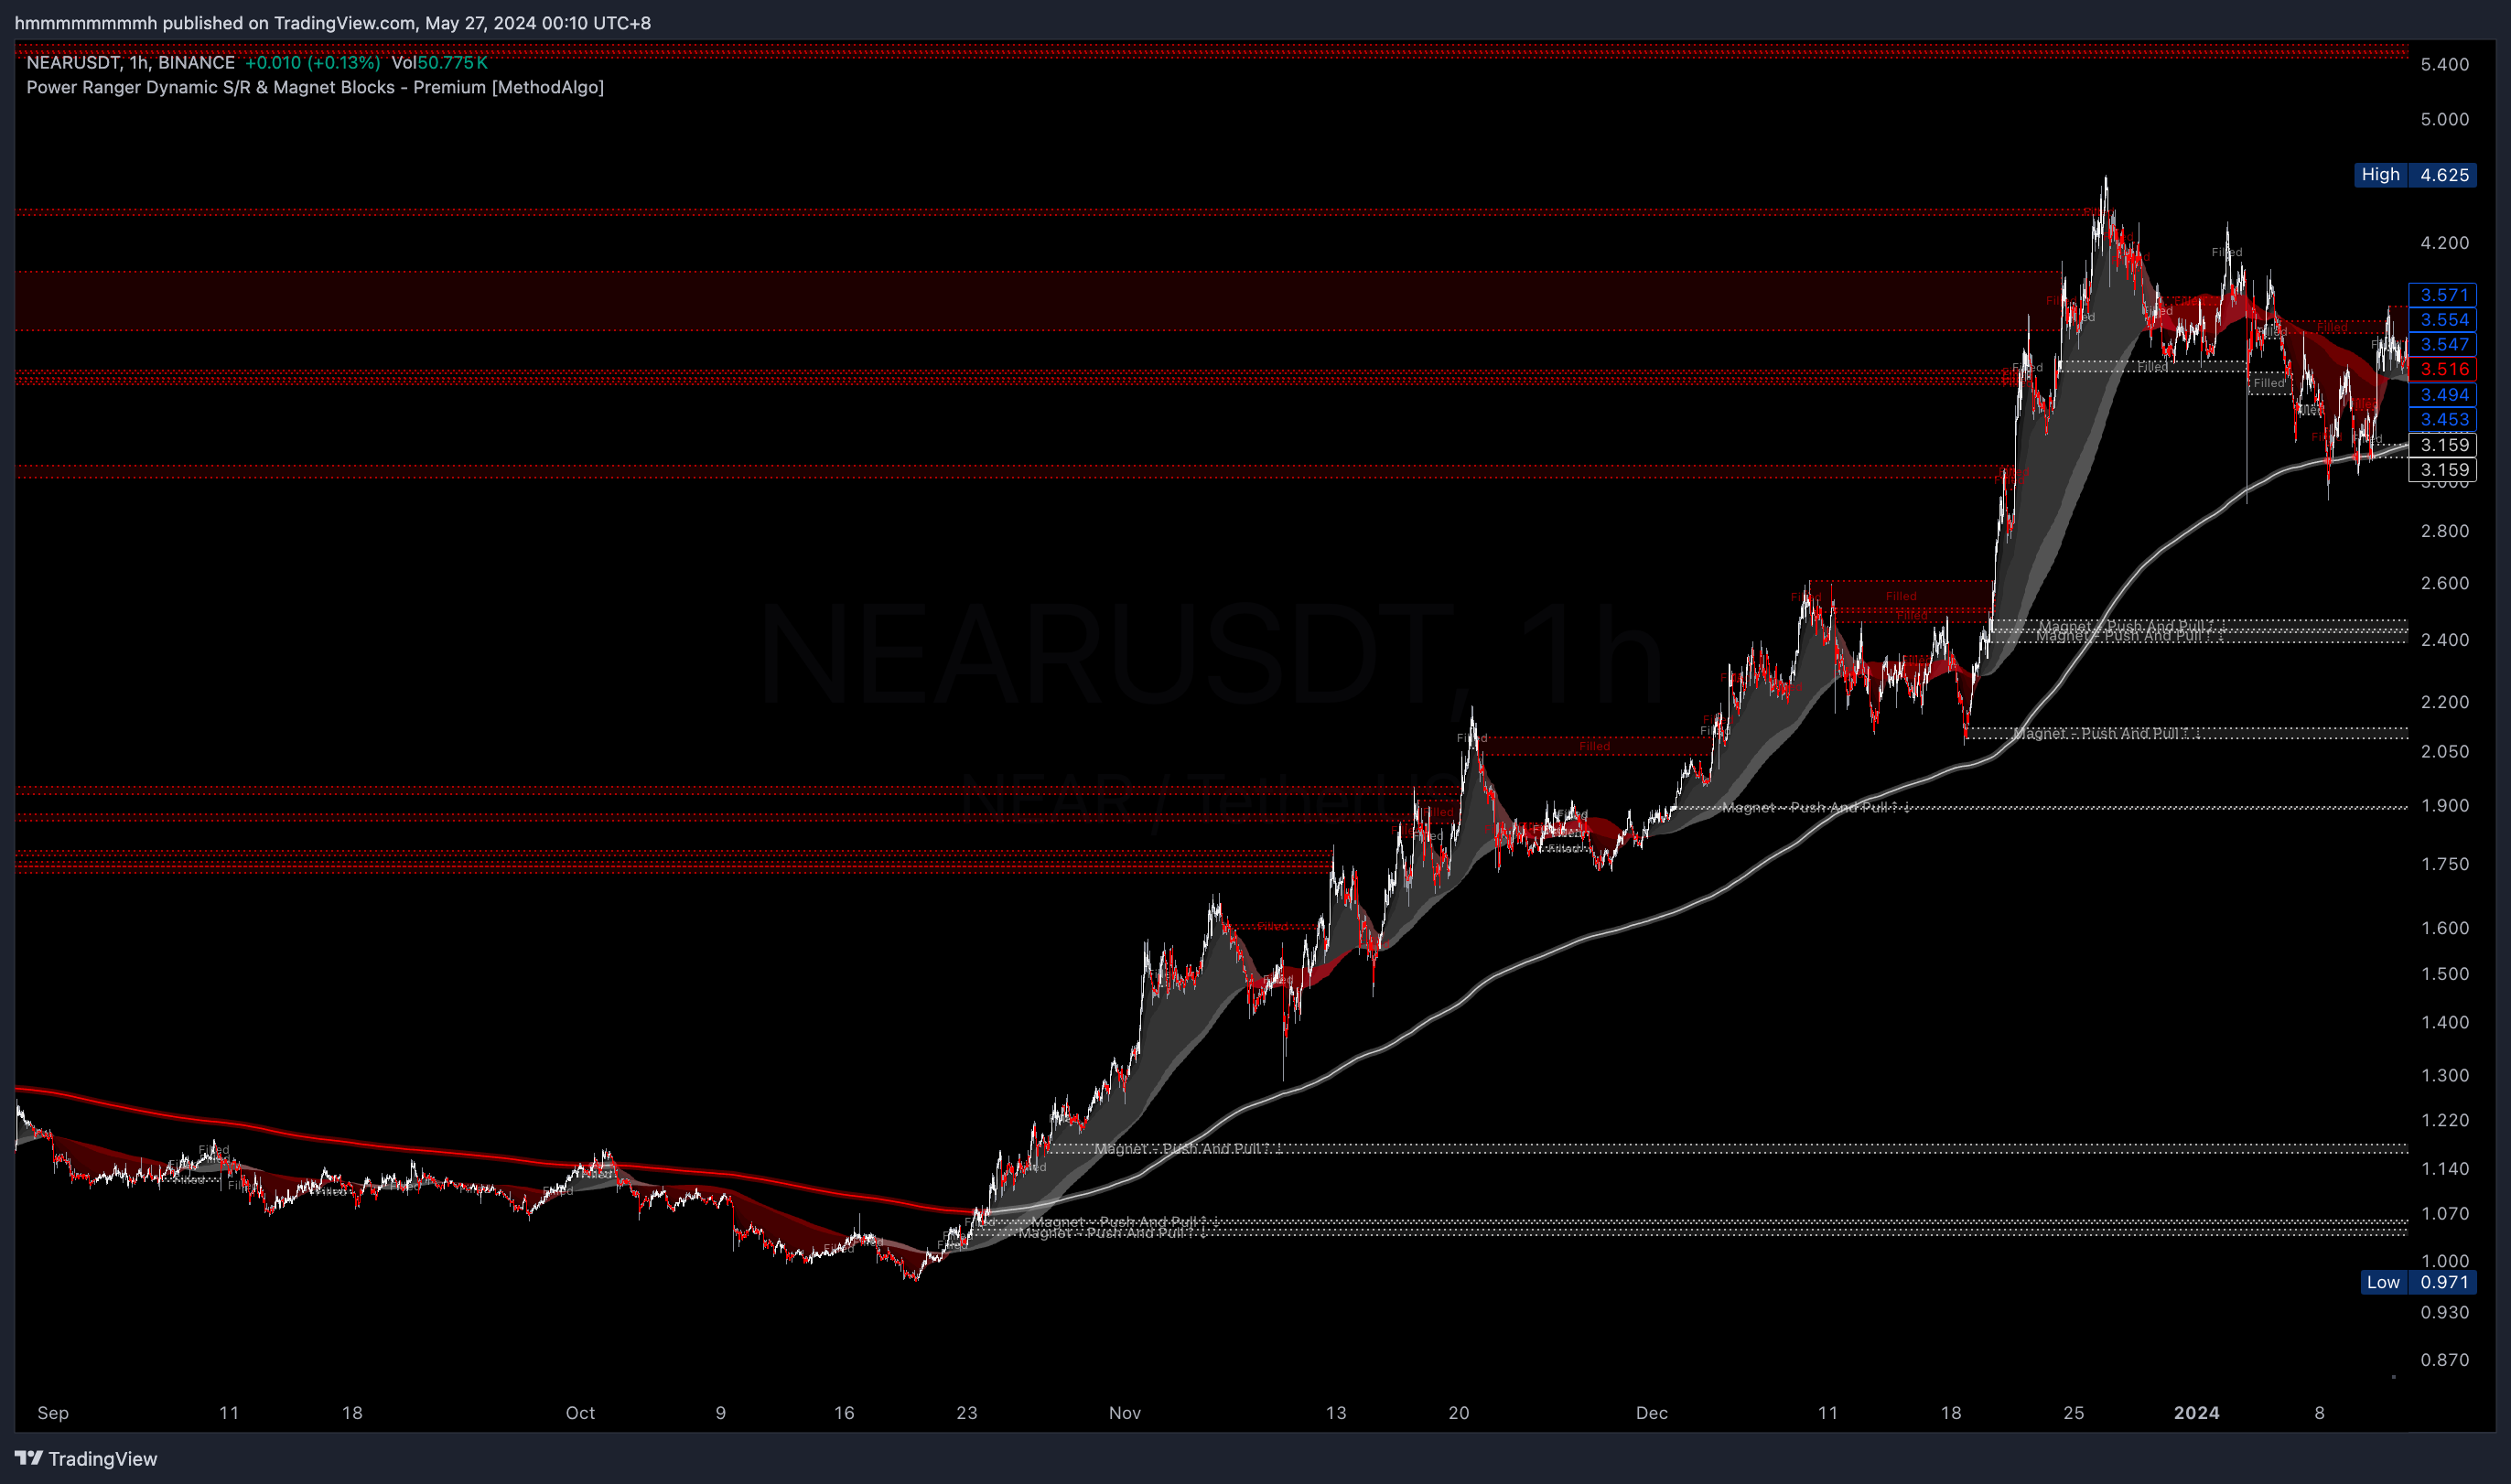 NEARUSDT 1h uptrend
When the price is below the trendline, bear magnets are likely to be strong bear magnets. As long as the price does not rise above the trendline (maintaining a downtrend), we can reasonably expect the price to continue falling to fill the bull magnets.
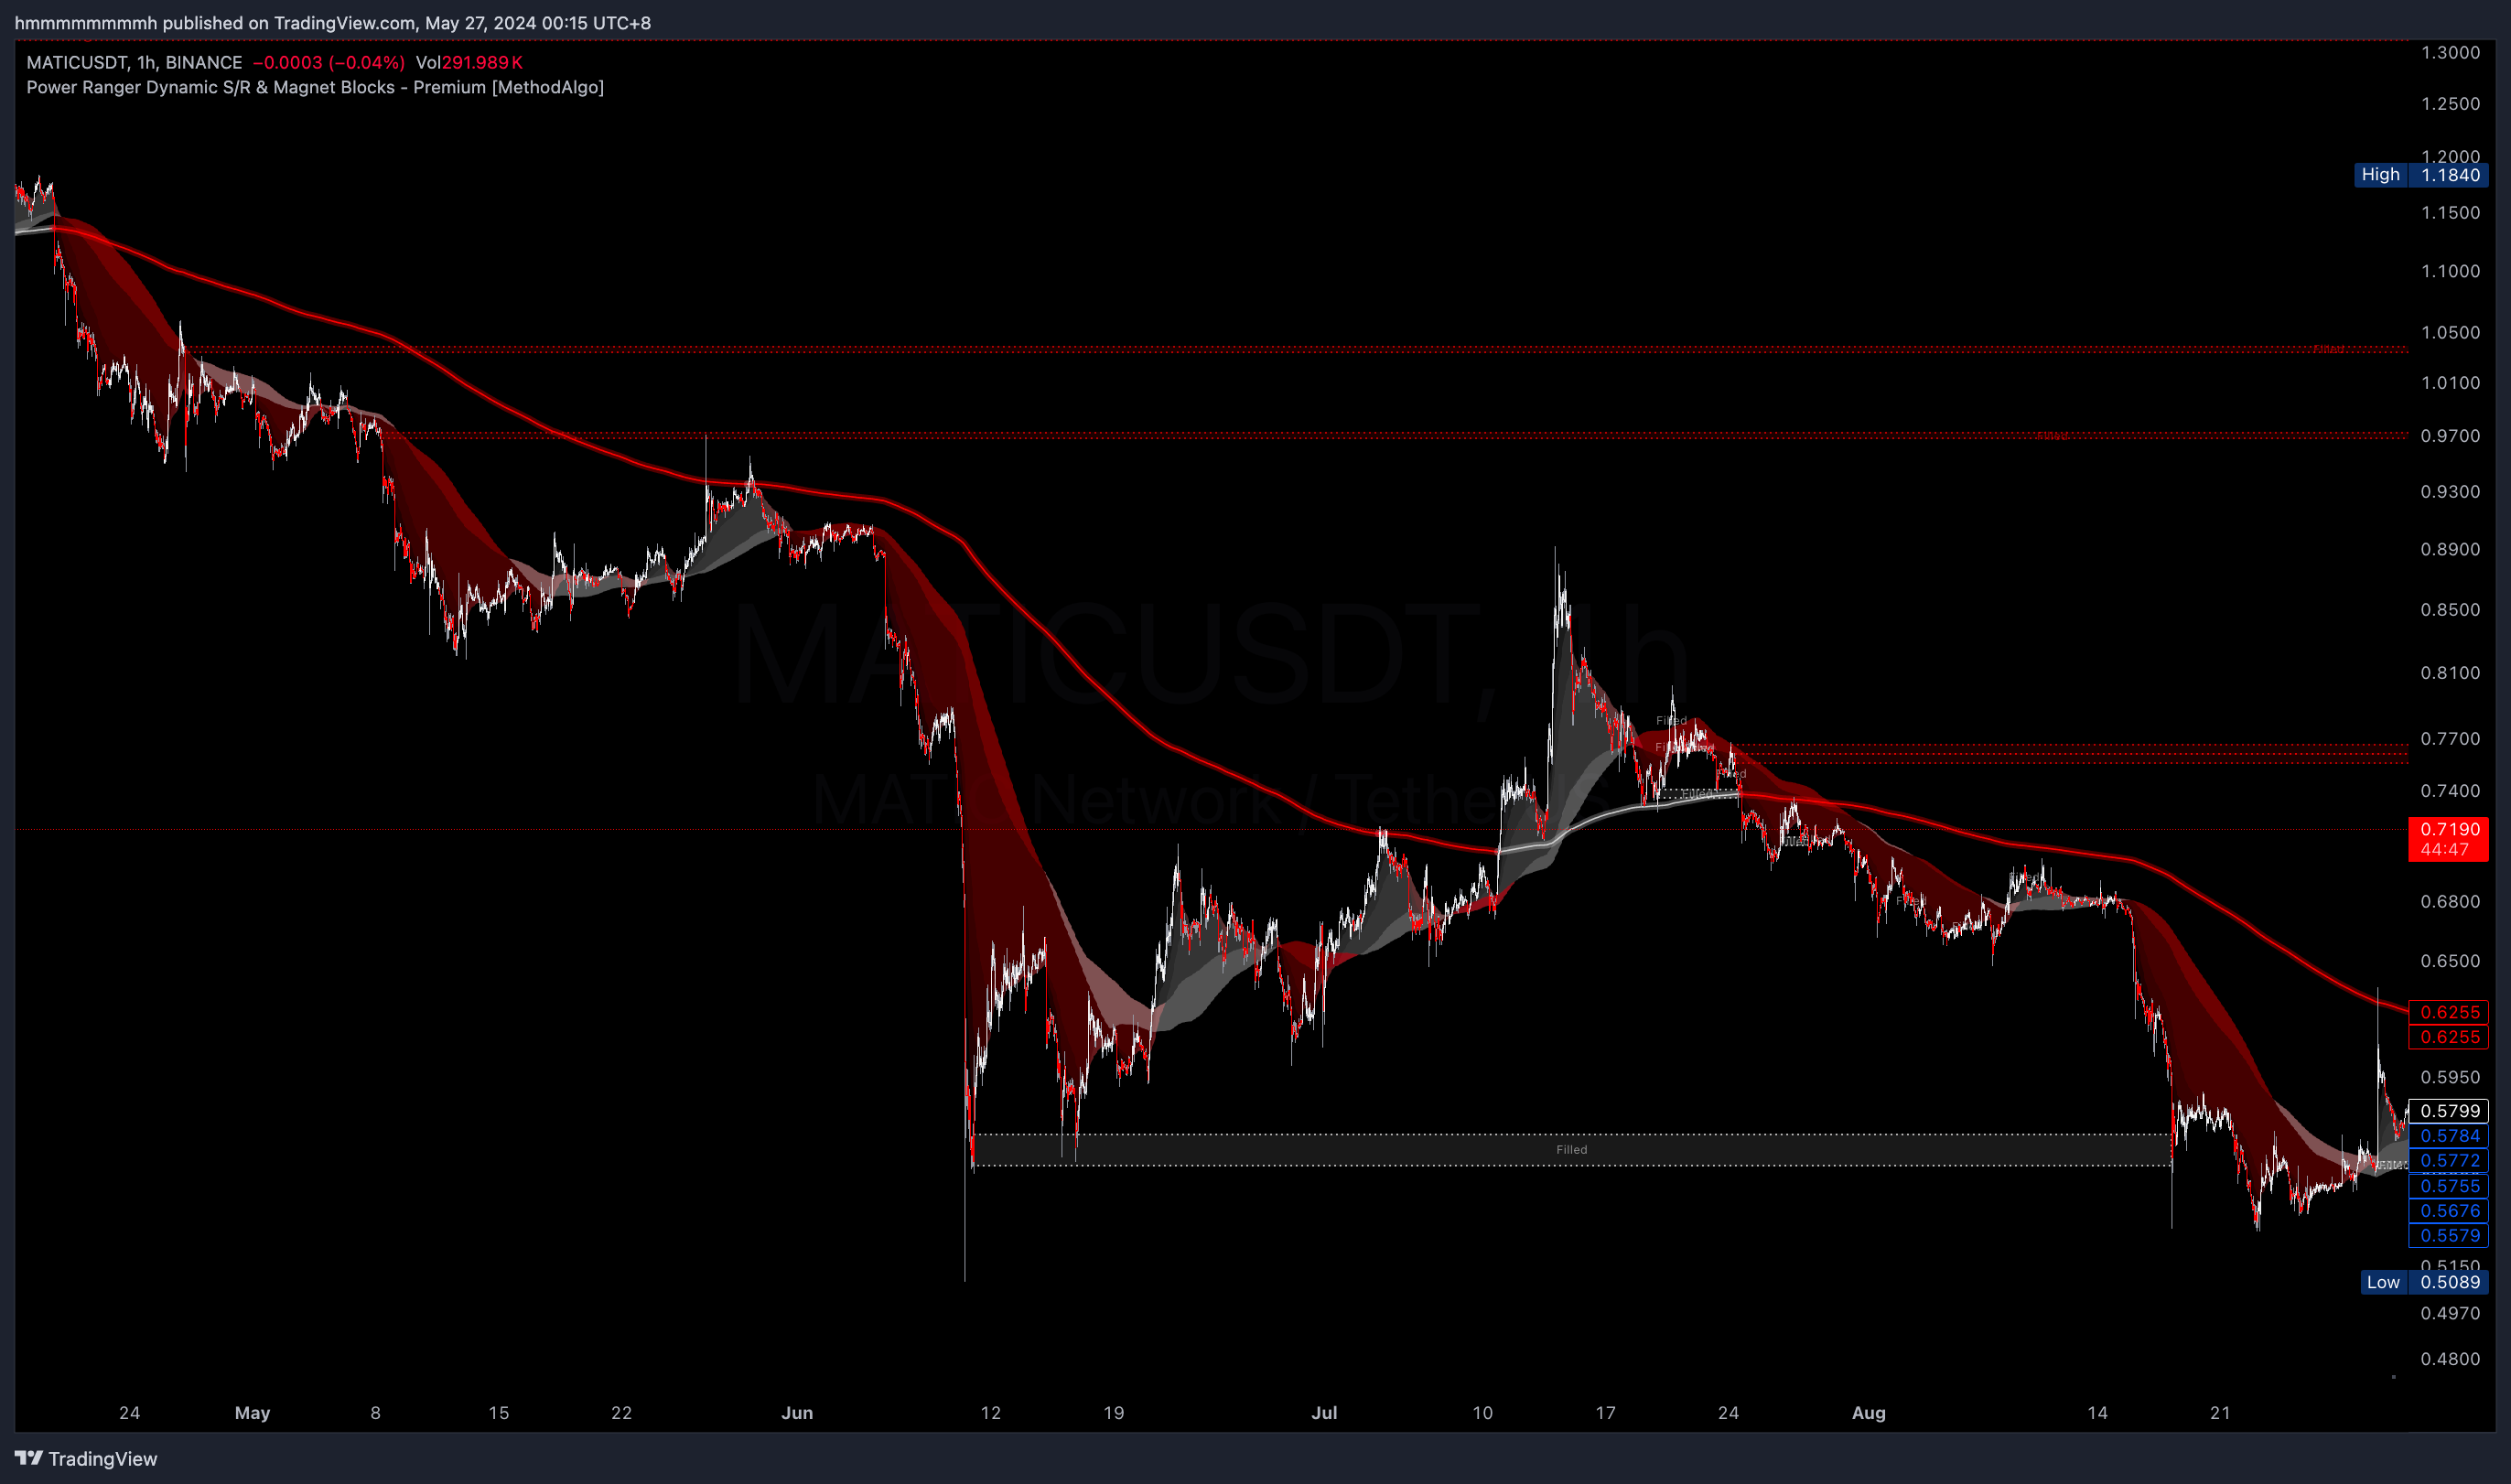 MATICUSDT 1h downtrend
Contrarian Trading and Multiple Same-Direction Magnets
In an uptrend with a bear magnet, if traders believe it is a good short opportunity and use the Push Strategy, they should place their SL above the uppermost bear magnet for maximum safety, regardless of entry point. Do not use newly generated bear magnets below as SL.
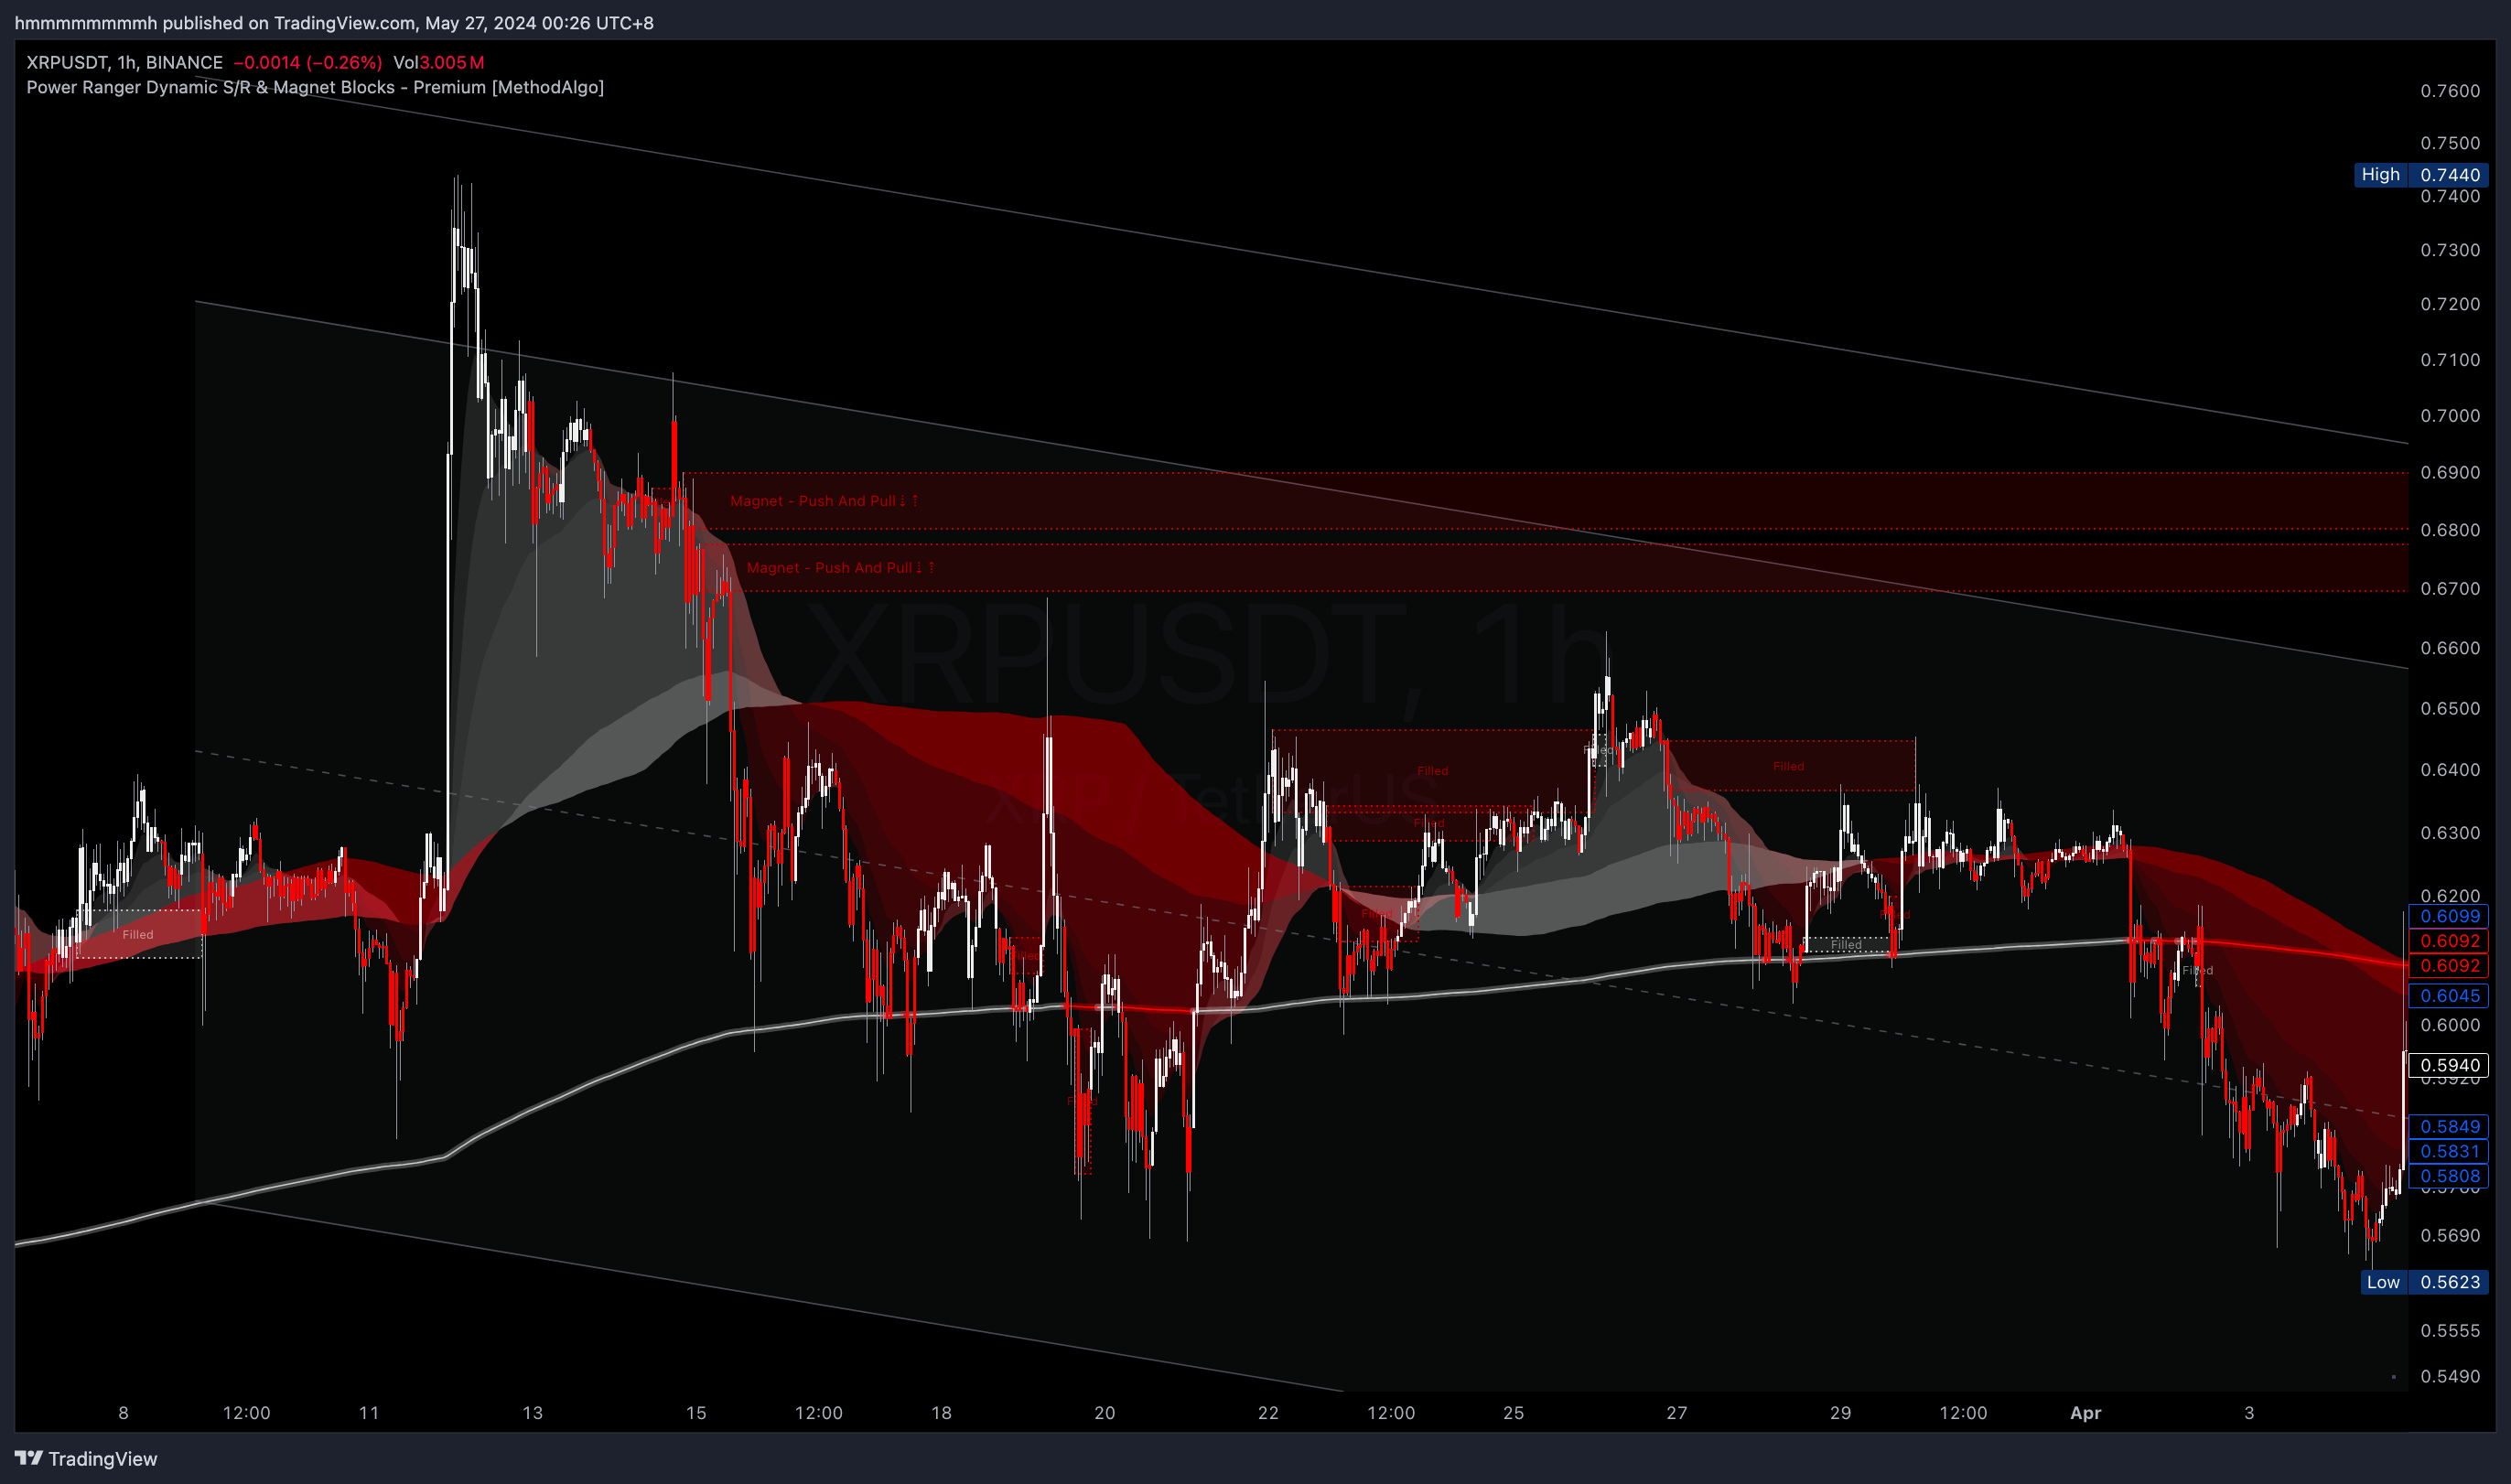 XRPUSDT 1h consolidation
Reversal Signal from Liquidity Detective and Magnets
In consolidation or both uptrend and downtrend, observe your Liquidity Detective indicator after a magnet appears. In the following situations, the magnet can be considebear strong:
- In Apex mode, and Apex supports your direction.
- Before the magnet appears, there are reversal triangles supporting your direction (see LINKUSDT chart below).
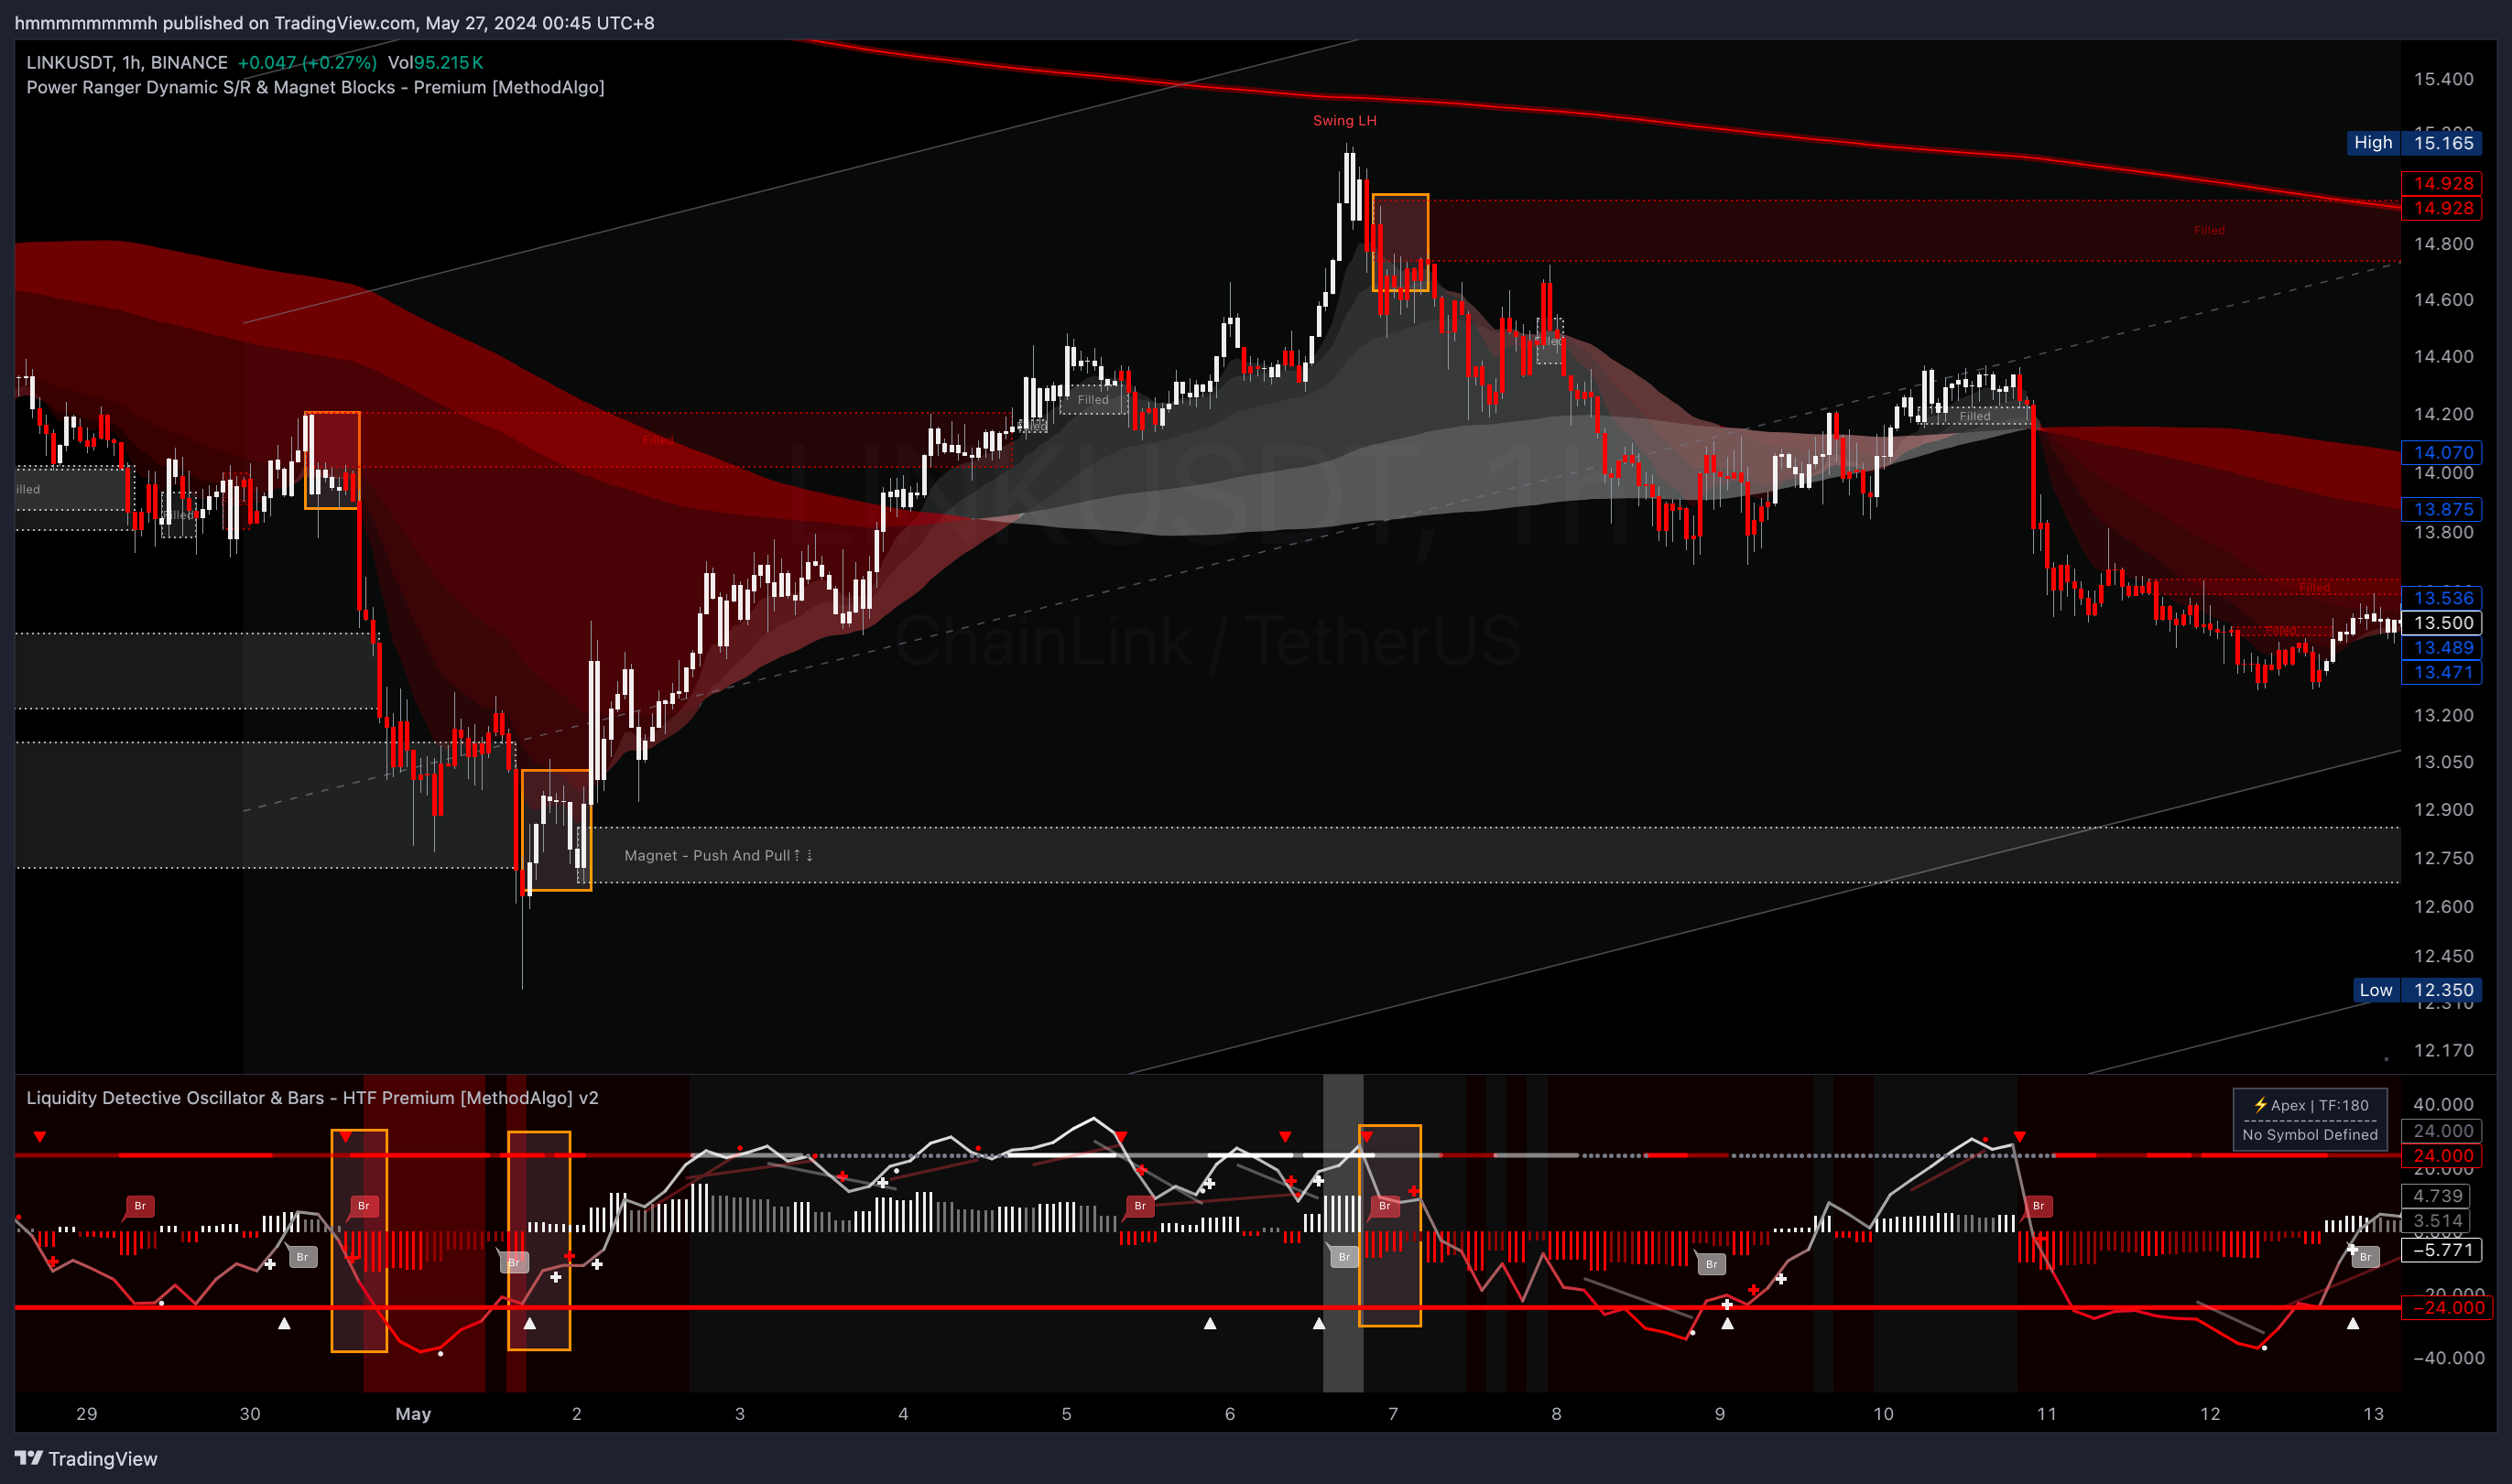 LINKUSDT 1h consolidation
Pangolin Channel and Magnets
Use magnets as time opportunity signal with the Pangolin Channel. In the chart below, in a descending channel, bear magnets at the top of the channel are good entry signals, the higher, the better.
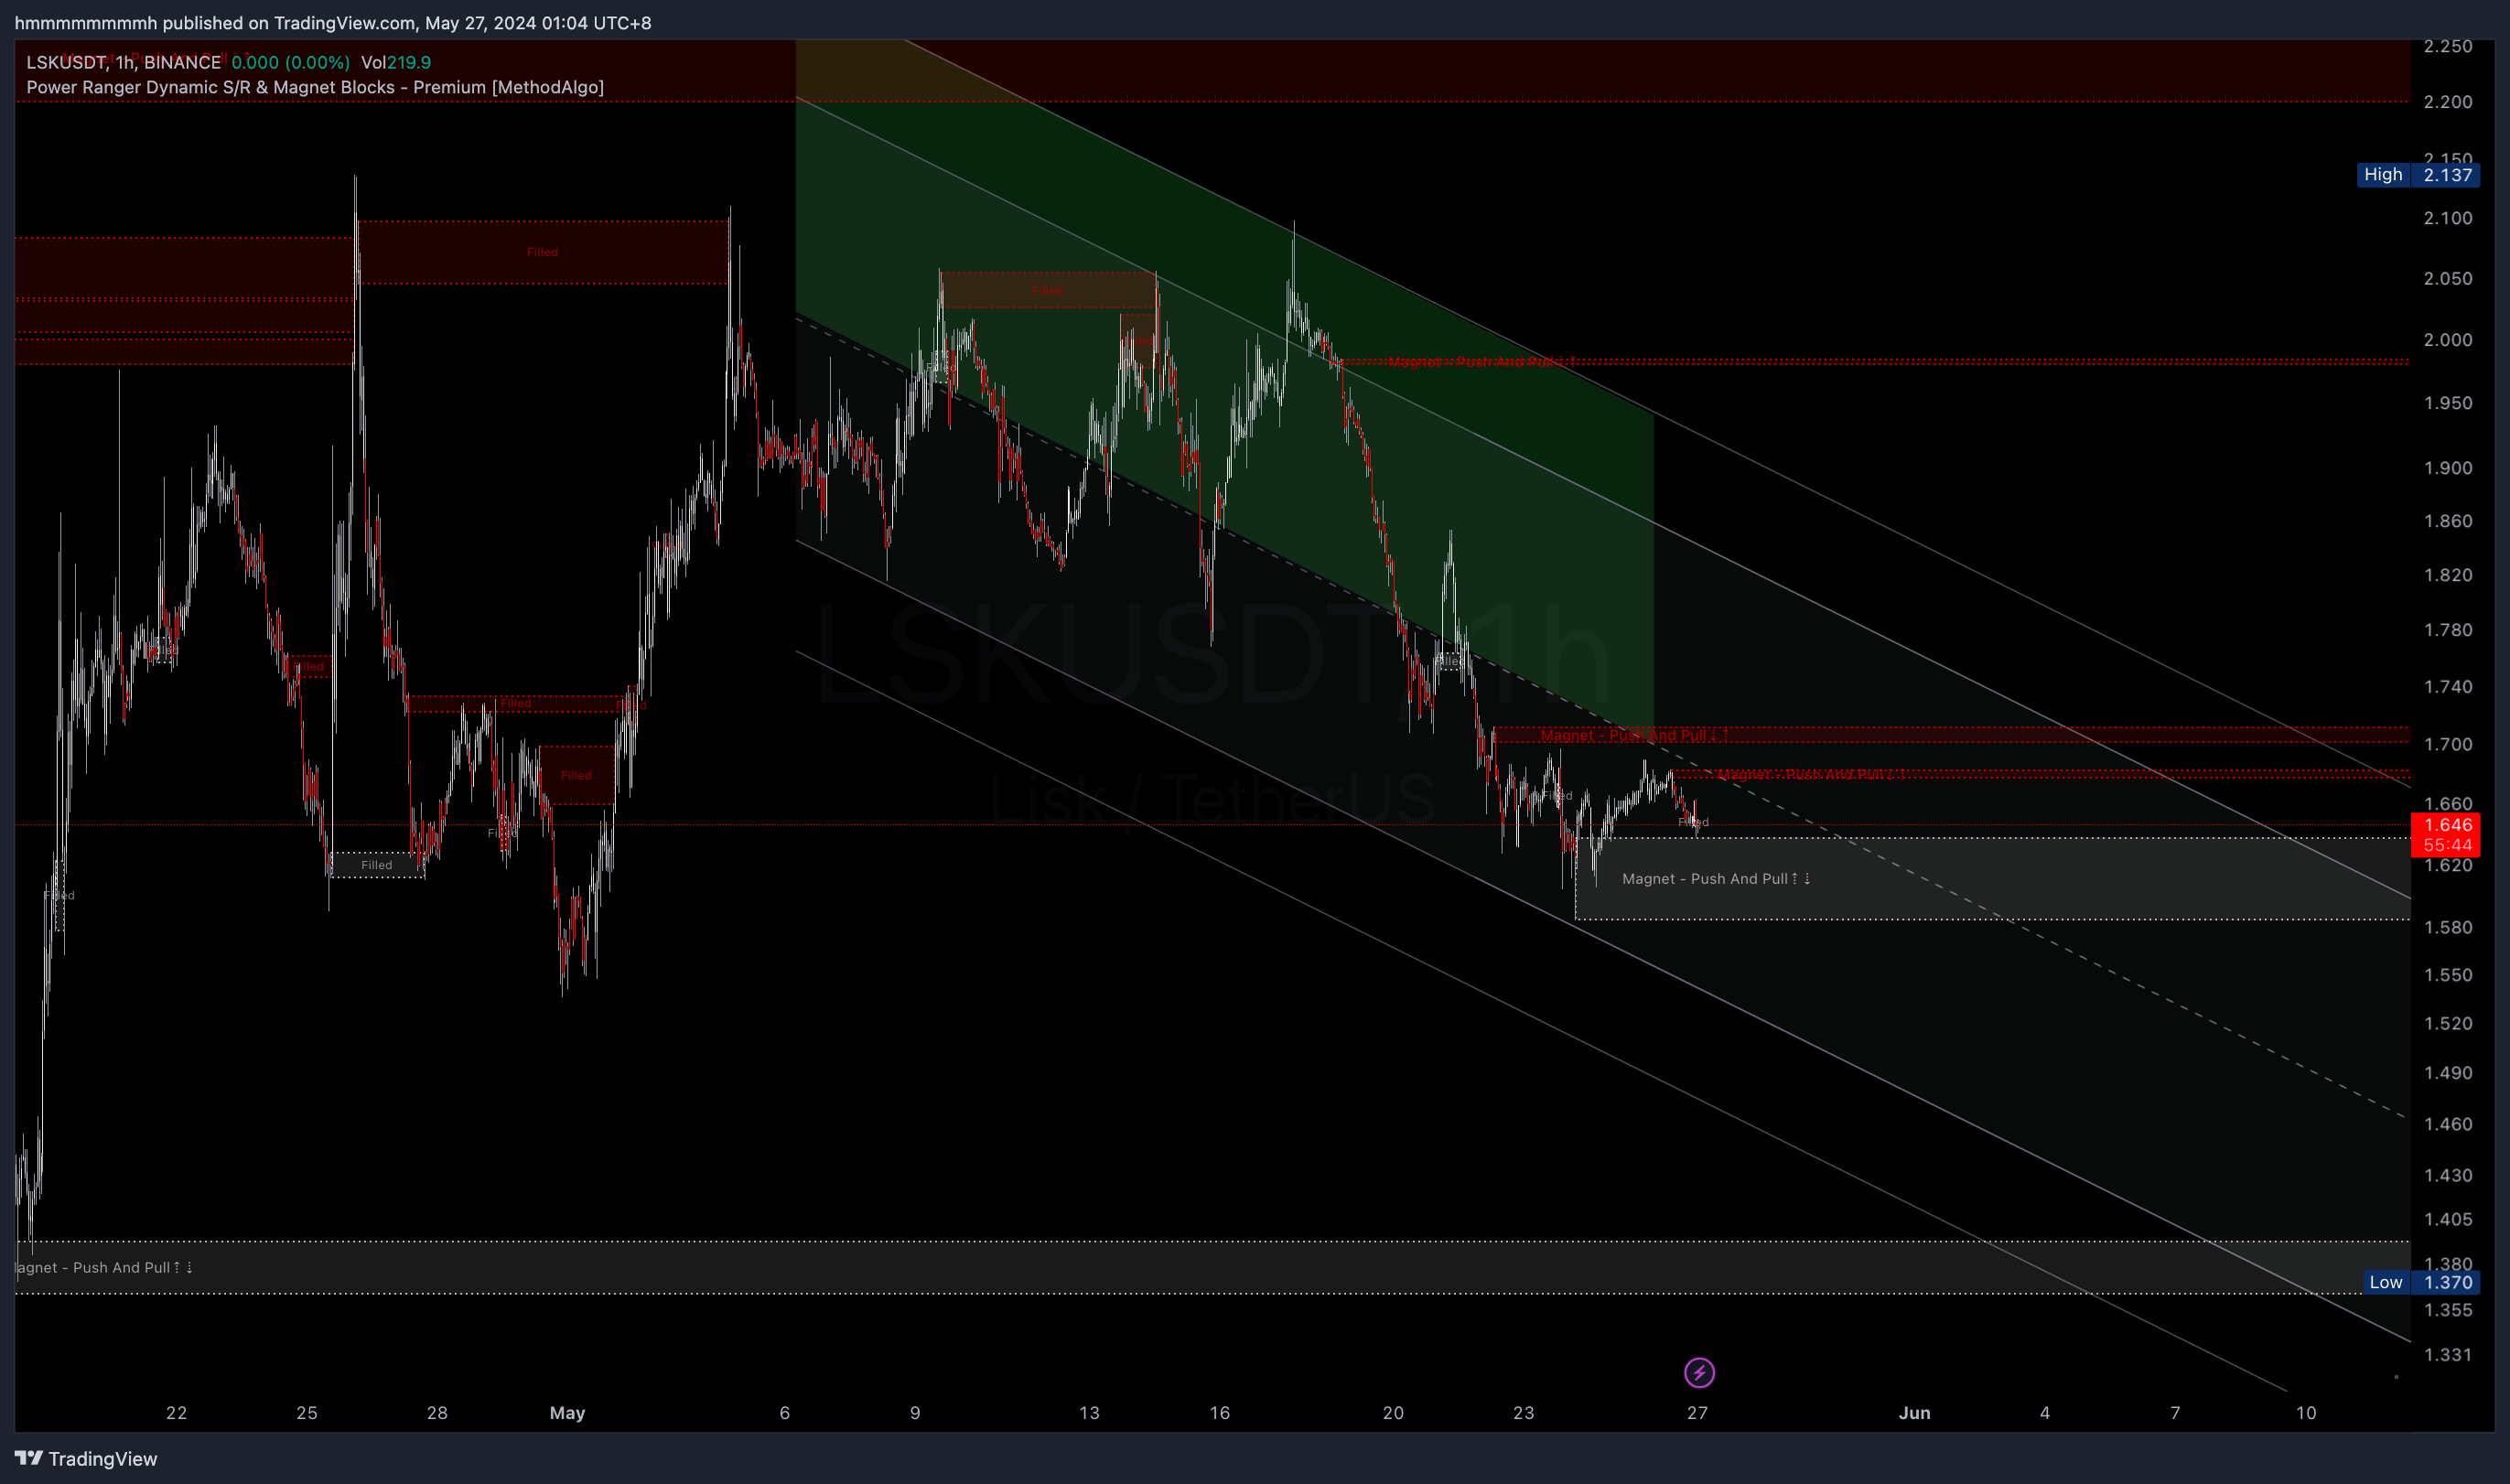 LSKUSDT 1h descending channel
In the chart below, in an ascending channel, bull magnets at the bottom of the channel are good entry signals, the lower, the better.
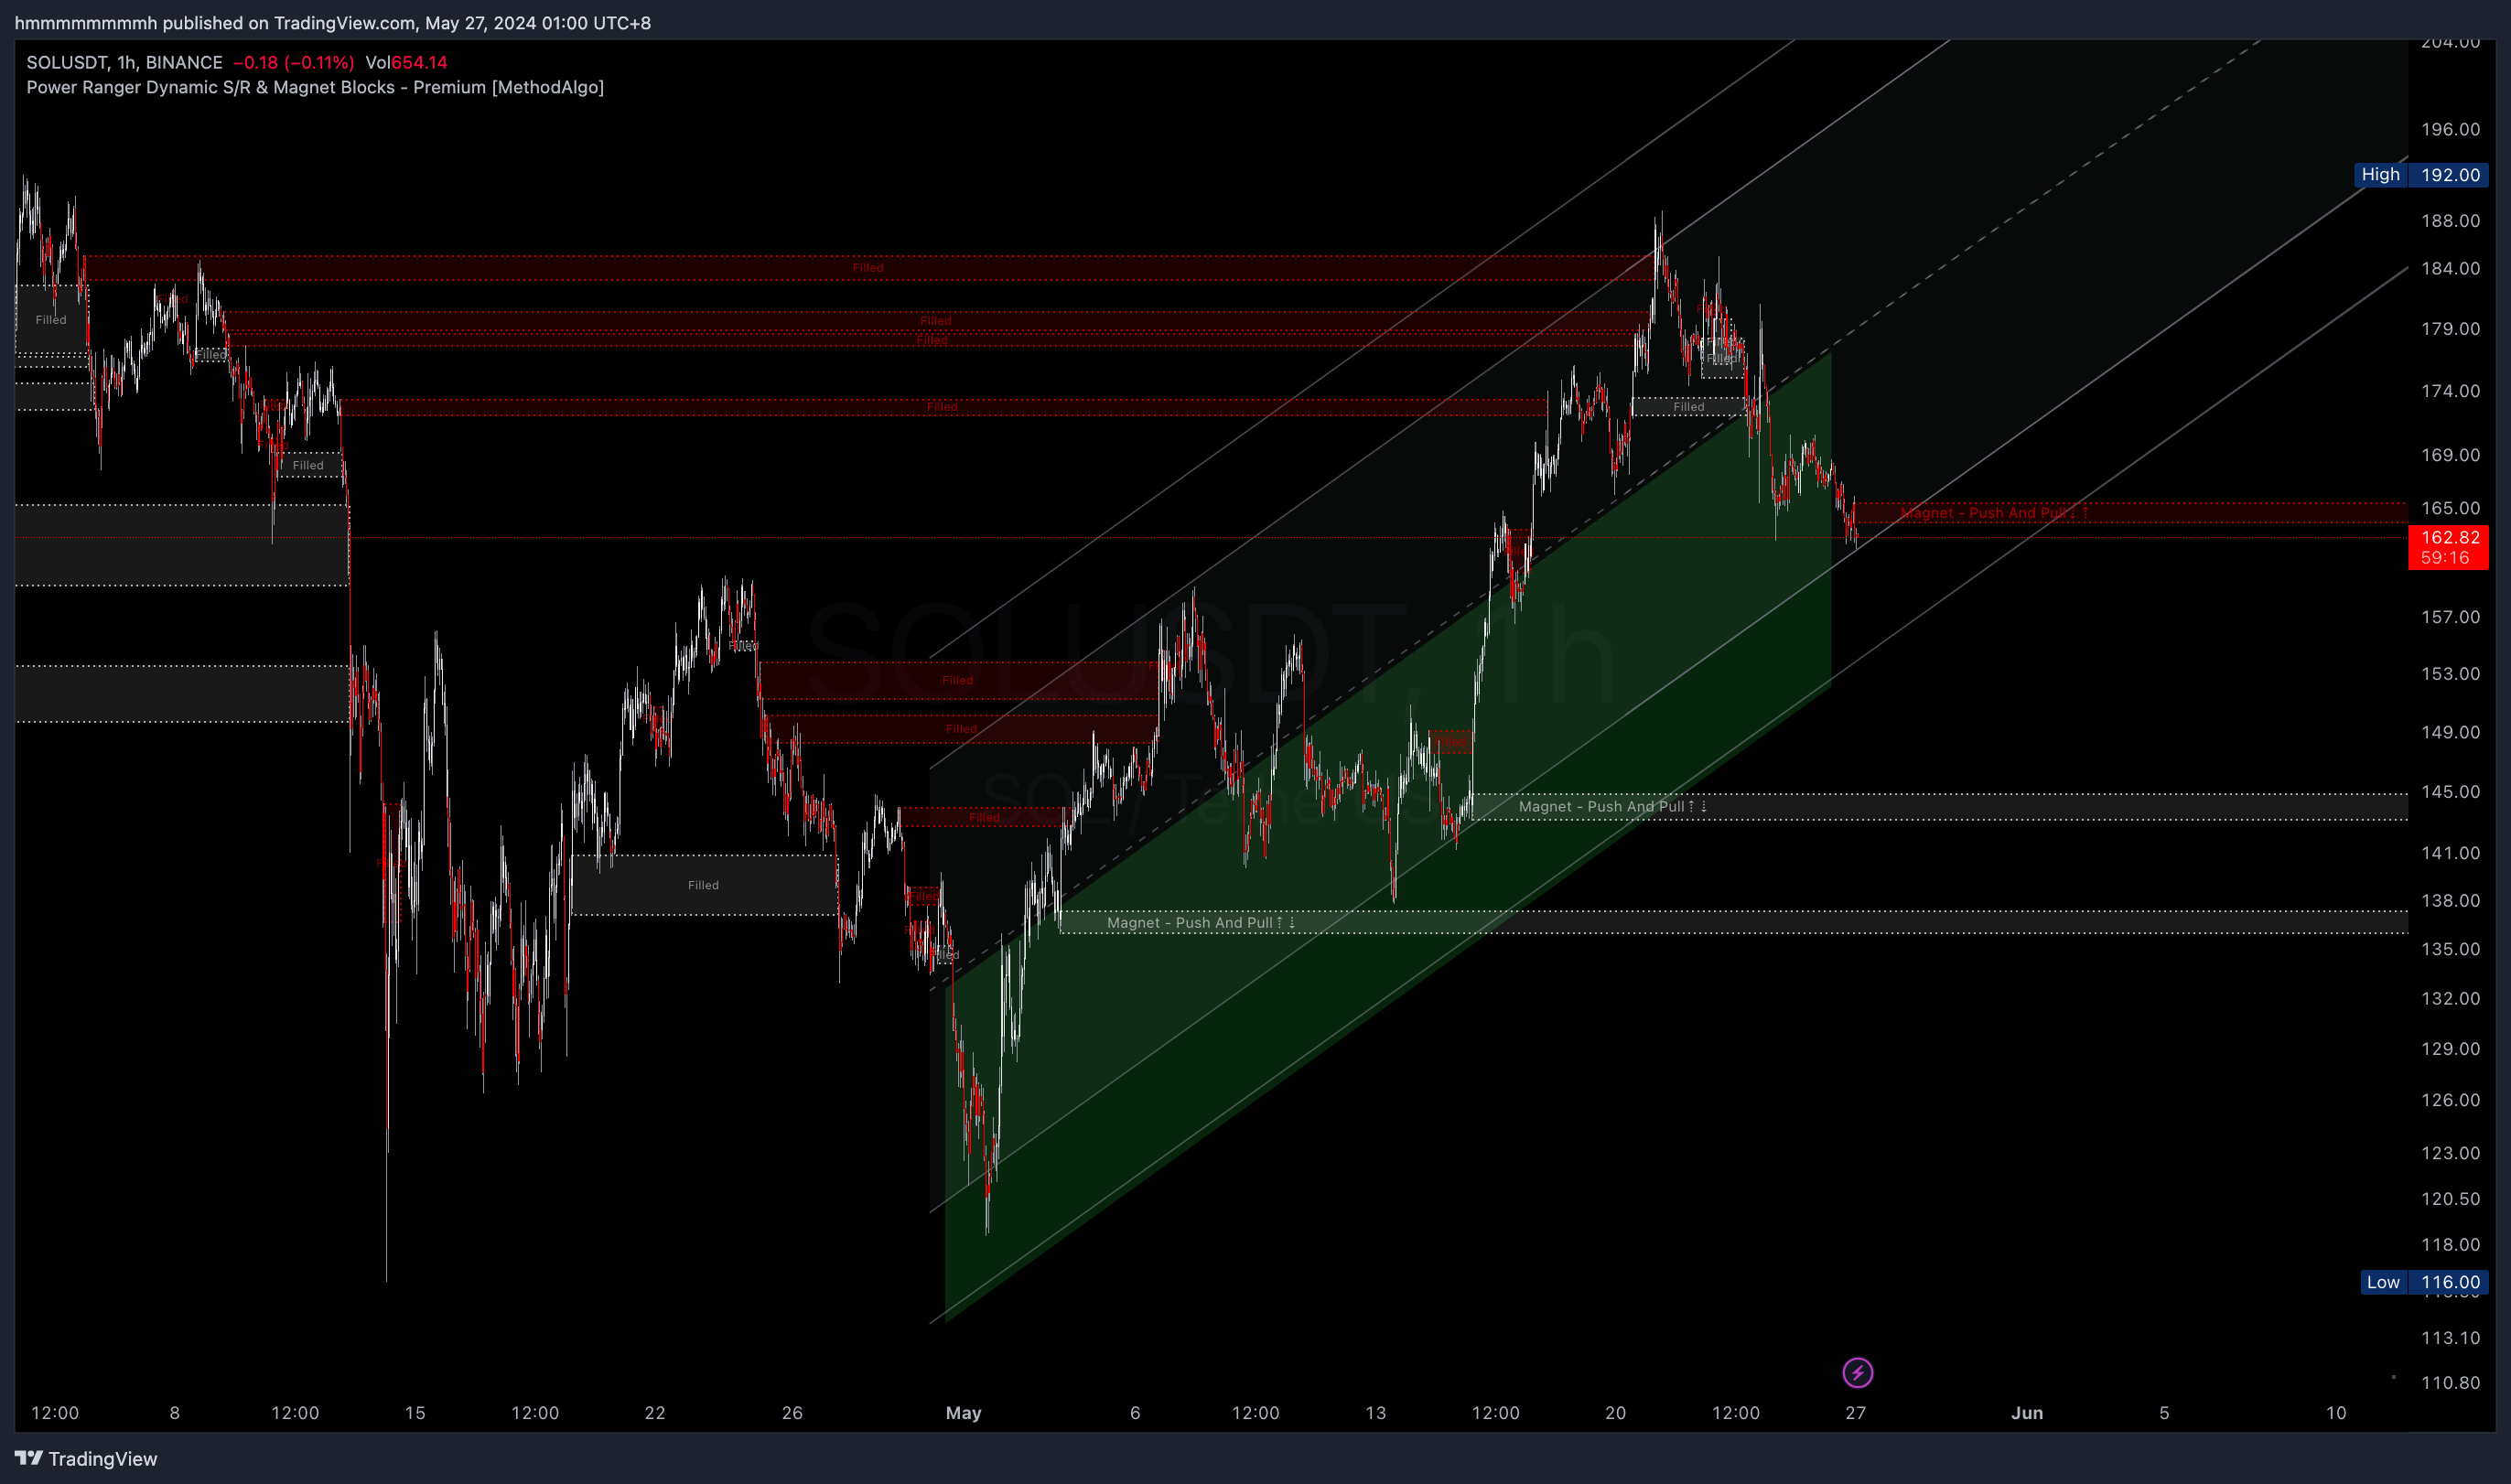 SOLUSDT 1h ascending channel
High Difficulty Consolidation
In pairs like BTC that are highly influenced by fundamentals/news and are in consolidation, the Push Strategy for magnets is very unfavorable (but the Pull Strategy is unaffected).
In the 1h chart below, we see low magnet efficiency because BTC has been range-bound for over a month without significant appreciation or depreciation.
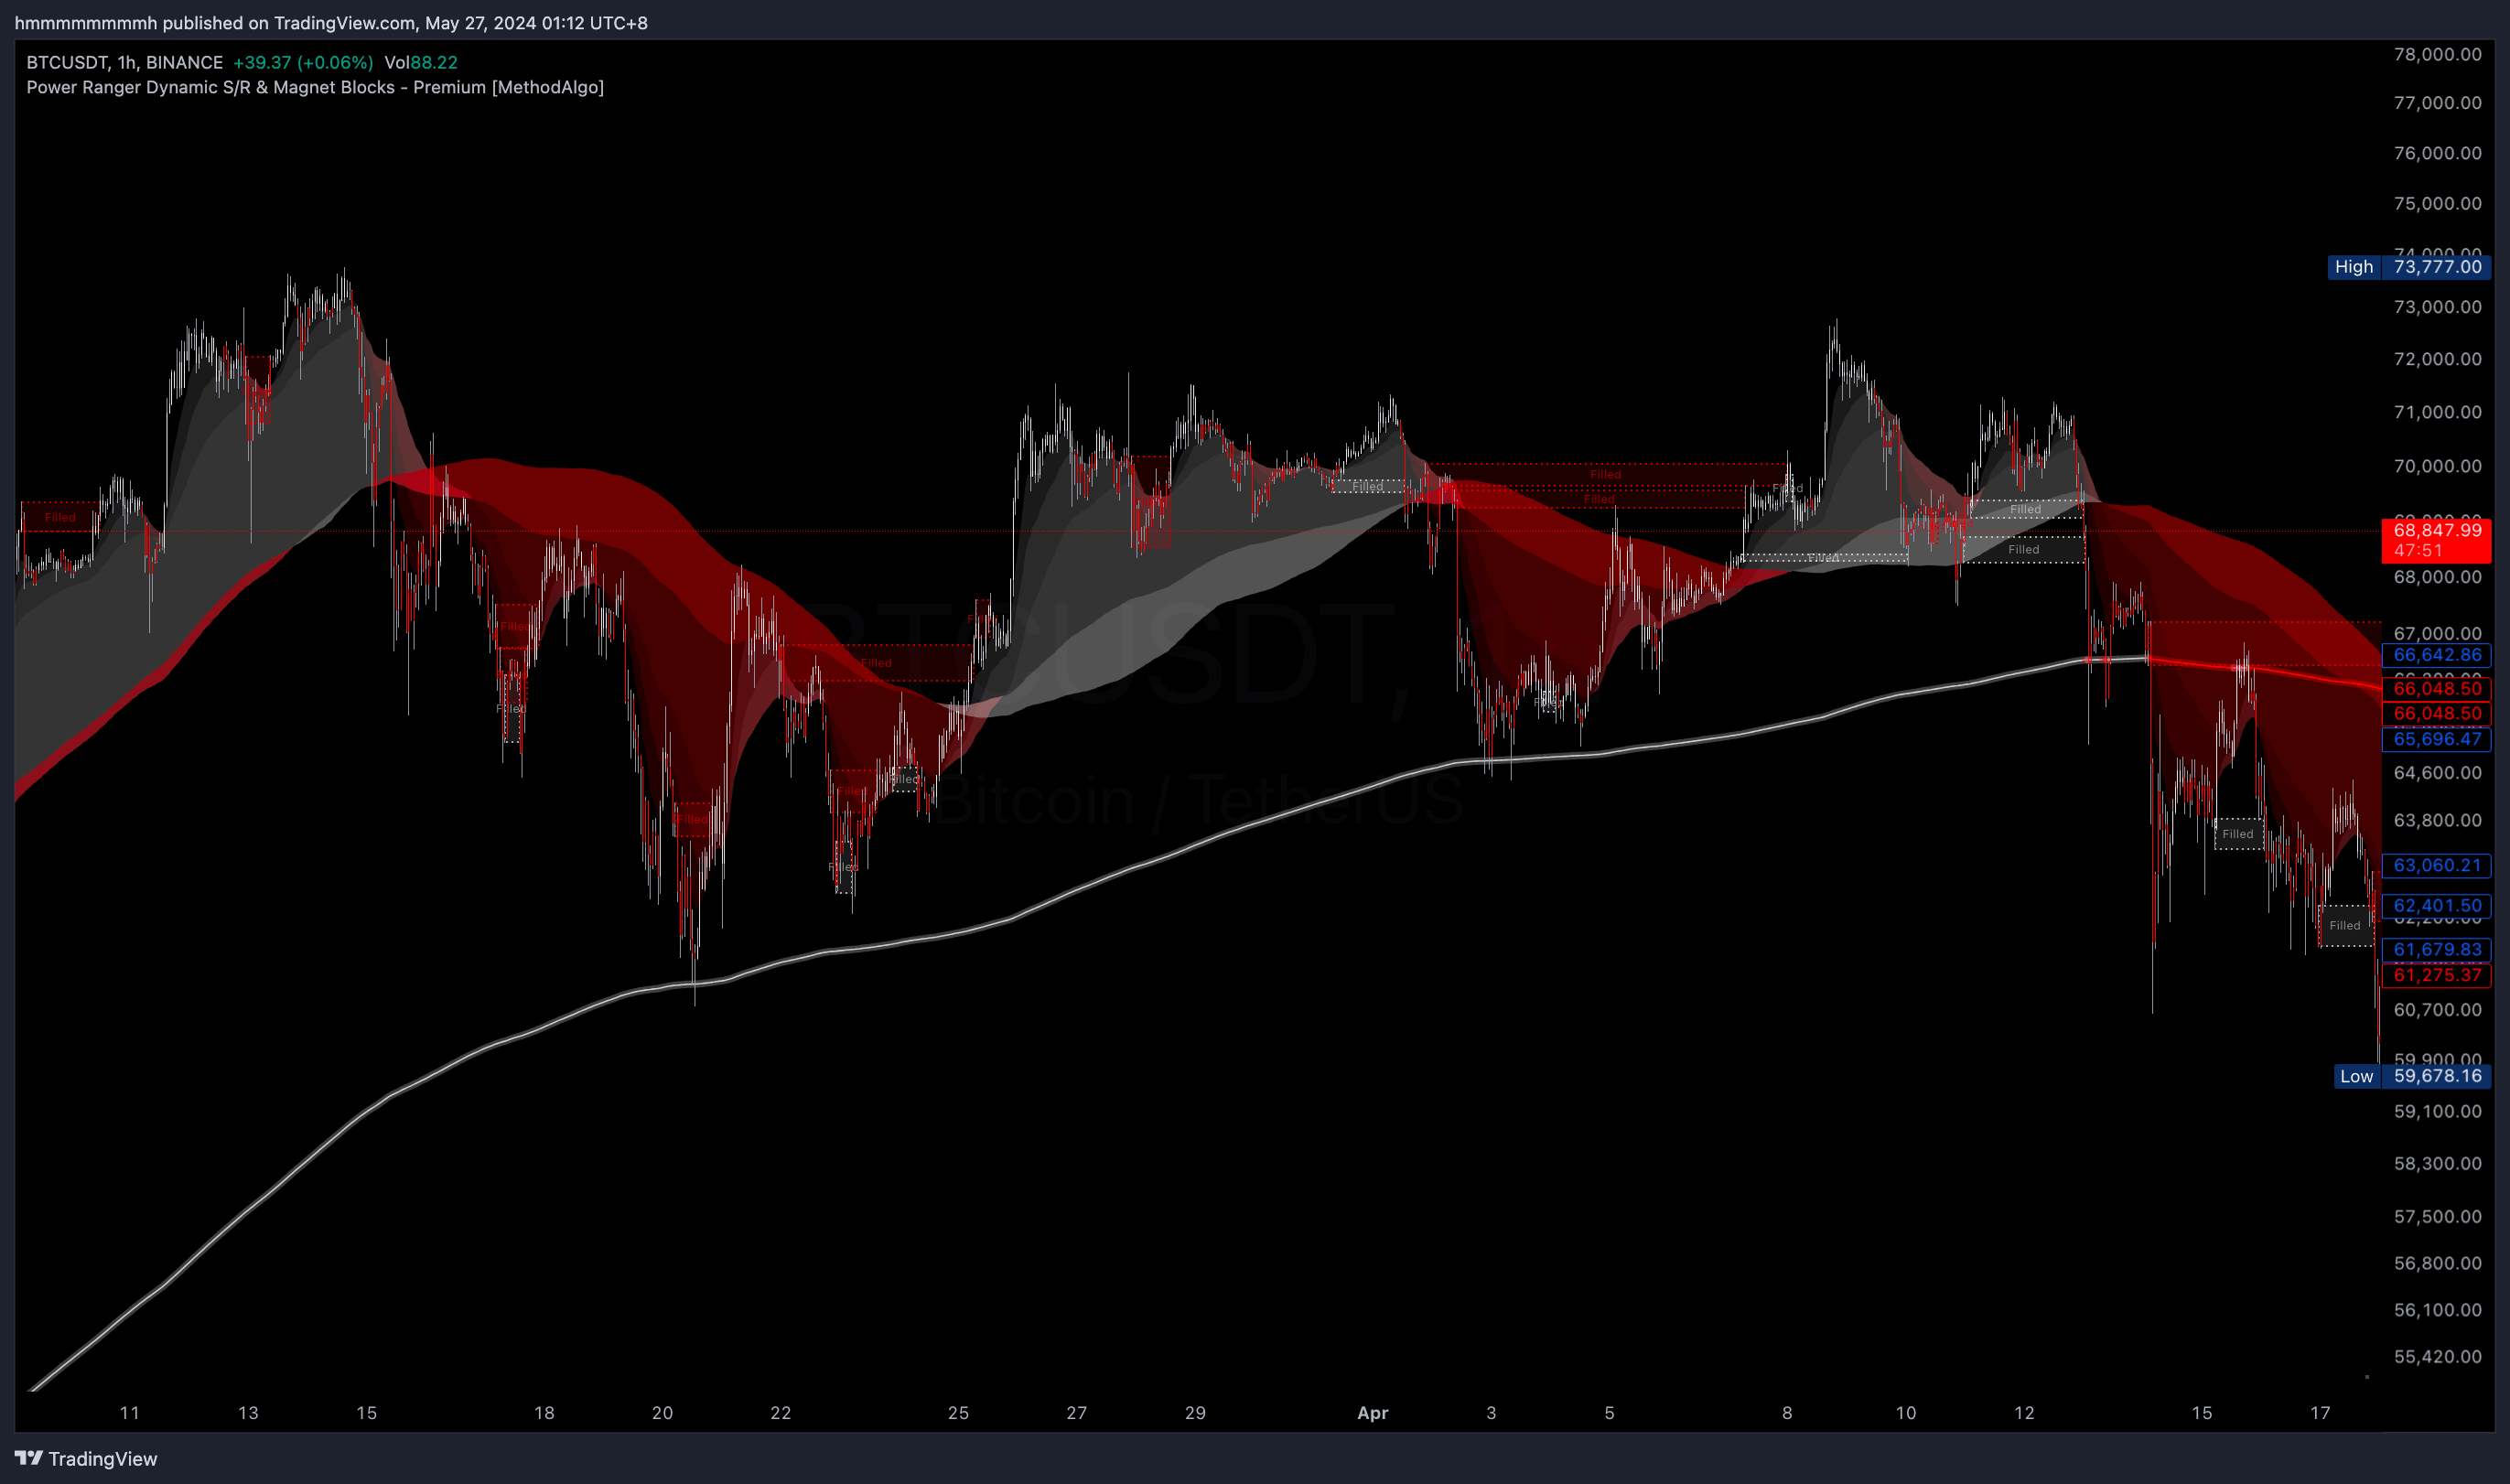 BTCUSDT 1h consolidation
During consolidation, many traders prefer not to trade. However, if you are a scalper, the normal strategy is to switch to a lower time frame (LTF) and trade by swinging, making profits through oscillation. In this case, LTF magnets are more useful (see the chart below). It becomes easier to use the strategies described above.
 BTCUSDT 10m within the same area as the 1h chart above
High Time Frame Confluence
Magnets in higher time frames should have greater confluence value than those in lower time frames. Magnets in the 1D time frame, even if weak, can yield substantial profits in medium time frames (MTF) or lower time frames (LTF) because, for example, one 1D candle equals 24 1h candles.
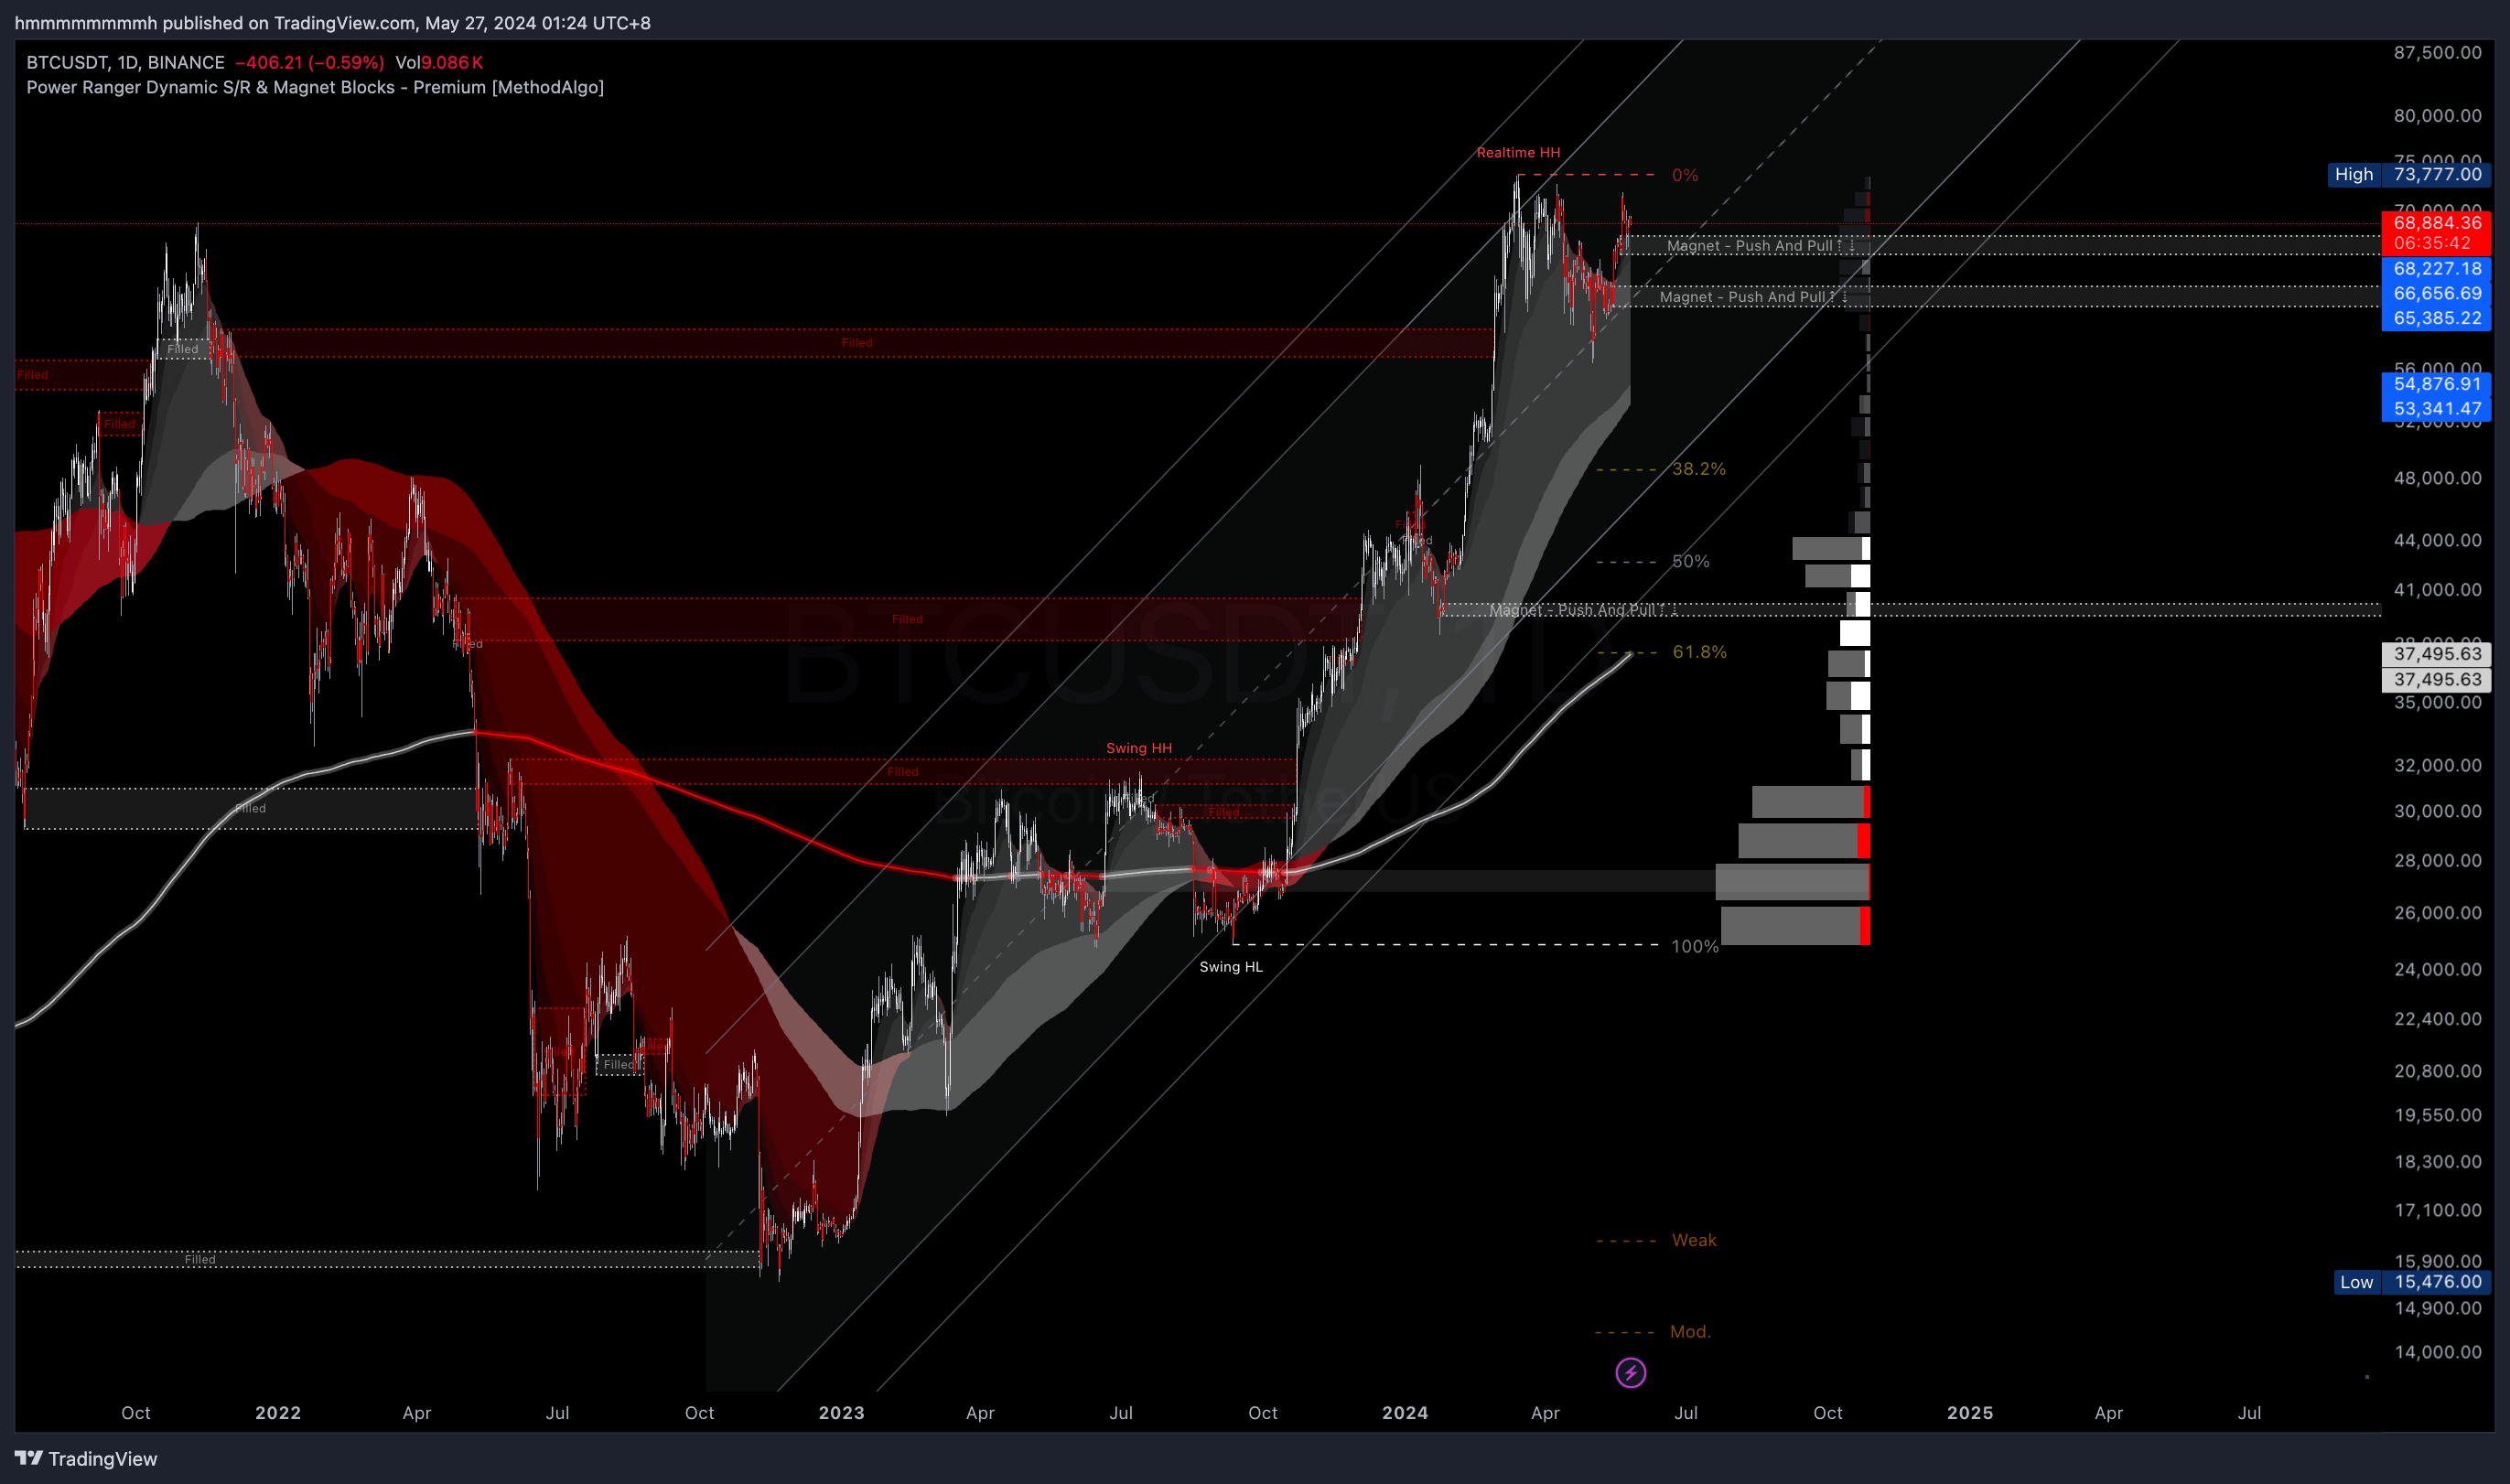 BTCUSDT 1D
ETHUSDT 1D
Parameter Settings
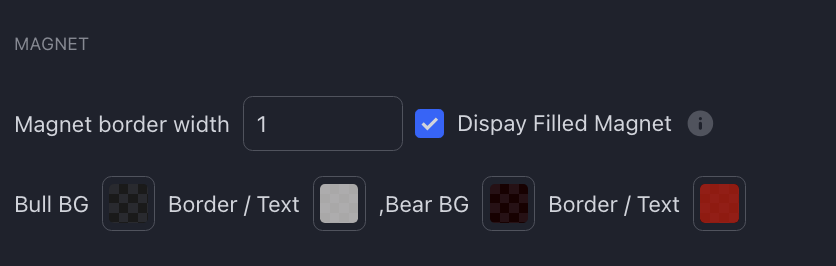
- Magnet Border Width: Thickness of magnet borders (aesthetic setting)
- Display Filled Magnet: Show filled magnets, default is off
- Bull BG: Background color of bull magnets
- Bull Border/Text: Border and text color of bull magnets
- Bear BG: Background color of bear magnets
- Bear Border/Text: Border and text color of bear magnets
Notes
-
Magnet blocks generated by the latest candle are only confirmed after the candle closes.
-
Filled magnets become invalid and have no analytical value for subsequent price movements.
-
Use magnets as support/resistance for SL placement only when no other suitable support/resistance is available. Since magnet positions attract price due to liquidity changes over time, they may quickly lose effectiveness in highly traded pairs. Use Fibonacci, volume distribution, etc., for verification.
-
Distinguishing strong/weak magnets is crucial for the Push Strategy; default magnets are weak until proven strong.
-
After a magnet appears, the price will almost always return to fill it, though the time variable is unknown, from minutes to years. Observe BTC, BNB, etc., for examples from past market cycles.
-
The extent and duration a magnet pushes the price are unknown. Magnets only responsible for initial price ejection movement; other factors influence subsequent price action.
-
Magnets are better suited for TP targets, i.e., the Pull Strategy, allowing confident bias towards filling old magnets.
-
Without bear or bull magnets, use other tools to determine TP targets (e.g., Fibonacci, swing highs/lows, volume profile, Pangolin Channel).
-
In some cases, magnet blocks might differ between the same asset's futures and spot pairs (e.g., BTCUSDT.P vs. BTCUSDT) or between different exchanges (e.g., Binance BTCUSDT vs. OKX BTCUSDT). This difference arises because each pair represents a different market with varying liquidity and volume.
Although charts for these pairs might look similar,they actually maintained and adjusted by various mechanism from market makers to exchange funding rates, etc. PowerRanger's algorithm produce result from and with the shown chart, so this variance is normal. Focus on the chart that you trade.
The engineers at MethodAlgo are proud of their work, but it's essential for you to understand that no indicator / algorithm can guarantee perfect success. Trading profits and losses are greatly influenced by the trader's psychology, knowledge, experience, and risk management.
The algorithmic interfaces we provide are all part of T.A.T.A. When trading in reality, traders should make their decision like T.A.T.A, considering various factors and signals from other tools to establish confluence system.
Any unclear explanations or errors in this tutorial? Please contact MethodAlgo's @Staff on the Discord Trading Terminal for corrections.